# 6. Hardware Troubleshooting

Guides for troubleshooting the MP Controller

# 1. Model 1A/1A+ - Using a Y-cable to provide more power to the display

A Y-cable helps deliver more power to the display when the computer USB port (such as a laptop) cannot provide the necessary power.

- <span dir="ltr">Model 2A has an extra power port on the outside of the enclosure therefore a Y cable is not needed.</span>
- Model 1A+ <span dir="ltr">has an extra power port inside the enclosure on the LCD board which can be used as an alternative to the Y-cable.</span>

![](/storage/uploads/images/gallery/2025-04/1745653902-DCkehTMHbxhUkF8Q.jpg)

---

 ![](/storage/uploads/images/gallery/2025-04/1745653902-fqgg2J0ymTILXL6S.jpg)

# 2. Model 1A: Display flickering issue or green screen

<span dir="ltr">This problem is caused by inadequate power to the Display port of the controller via USB-C.</span>

Recommendations:

1. Use the 1m USB-C cables we provided if you are using other longer cables.
2. Connect directly to the USB port of the computer if you are connecting it via a hub.
3. <span dir="ltr">The monitor can also be powered via a wall power adapter (a 10 Watt or more) phone charger can power on the monitor however if you connect the USB-C Display port of the controller directly to a wall adapter the touch function will not work because touch data is transmitted via that port. To use a wall adapter to power the monitor and have the touch function working use a </span>[<span dir="ltr">Y-Cable</span>](https://kb.mpmidi.com/books/mp-controller-documentation/page/1-model-1a1a-using-a-y-cable-to-provide-more-power-to-the-display)

---

**Green Screen when connecting the HDMI**

<span dir="ltr">If you get a green screen, this is called aging mode, it's a testing mode for monitors. </span>

<span dir="ltr">To stop this mode, t</span>here is a slit on the side here where there is a power button.

![](/storage/uploads/images/gallery/2025-04/1745653903-zvLsm5DcNJix5kMv.jpg)

<div dir="ltr" id="bkmrk-using-a-pointing-obj">Using a pointing object, press and hold the monitor's power button until it shuts down (it's on the side). Then turn it on again, and connect the hdmi.</div>Alternatively, you can open the bottom cover and reach out for the button.

![](/storage/uploads/images/gallery/2025-04/1745653903-Cg3X1f5vF3VERQ0u.jpg)

# 3. Differences: between MP Controller's Models

##### **Model 2A (latest)**

The new model 2A was announced in May 2023, has a new enclosure design - a glass flat top, less height on the front for a steeper viewing angle when placed flat on desk, rack mounted ready with an optional rack mount kit, an additional USB-C port for providing extra power when needed.

(Model 1A+ has inside an additional USB-C port, while model 2A has the port available on the outside)

The touch display is exactly the same on both models 1A+ and 2A.

The touch display on model 1A is different and has a matte non-reflective finish.

All 3 models, model 1A, 1A+ and 2A are compatible with our MP Host plugin and all 3 models offer the same functionality.

---

##### <span dir="ltr">**MP Controller Model 1A+**</span>

The MP Controller model 1A+ was released in late November 2022 and it carries the same black metal enclosure as the model 1A.

The MP Host plugin works on both models and there are no differences in that part.

**The model 1A+ features:**

- a touch display with twice the brightness (from 250 nits to almost 500 nits)
- a glossy display finish instead of the matte display of model 1A and it produces more vivid colors than its predecessor
- an IR remote control for the settings of the display while in model 1A there are buttons
- works as a single touch screen natively on Mac OS including Apple Silicon while the display in model 1A required the UPDD software to enable the touch functionality on Mac OS after Mac OS Mojave. Practically speaking though, all users end up purchasing UPDD for its amazing additional functionality. (discounted from 150 GBP to 35 GBP with 3 years of support).
- As model 1A, works with UPDD on Mac OS for enhanced touch functionality like the [Smart Magnifier](https://www.youtube.com/watch?v=wO2_4cpVhLo)
- it is a multi-touch display on Windows just like model 1A
- ships with a 1m [Y-cable](https://kb.mpmidi.com/books/mp-controller-documentation/page/1-model-1a1a-using-a-y-cable-to-provide-more-power-to-the-display) for better power management/flexibility

# 4. Adjusting the brightness of the display

##### Model 1A+/Model 2A

On Model 1A+ and Model 2A a remote control is being shipped with the controller which can be used to control the screen's settings.

The remote control should be pointed to the IR receiver on the MP Controller

**Model 1A+**

[![image.png](https://kb.mpmidi.com/uploads/images/gallery/2025-04/scaled-1680-/HIvqNGfwpzvJSgl9-0Qiimage.png)](https://kb.mpmidi.com/uploads/images/gallery/2025-04/HIvqNGfwpzvJSgl9-0Qiimage.png)

**Model 2A**

![](/storage/uploads/images/gallery/2025-04/1745653903-o8VhnOUrdNspzb8l.jpg)To troubleshoot the remote control see[ here](https://mpcontrollerbyteltd.freshdesk.com/a/solutions/articles/103000322077)

---

##### Model 1A

The display has been pre-set to a brightness level of 100%.

The power drawn when the brightness level is at 100% may be not be enough for some USB ports. You can reduce the brightness level so that the monitor can operate by a lower power or use a   
[Y-cable](https://mpcontrollerbyteltd.freshdesk.com/a/solutions/articles/103000120676) to provide more power.

If you increase the angle of placement of the controller to a more upright position, we have found that brightness is satisfactory when set to about 70%.

You can change the brightness level using a small screwdriver to reach the two buttons from the slit on the left side of the controller or unscrew the bottom cover of the controller and adjust with your finger, as described on the next page.

Screen Buttons

![](/storage/uploads/images/gallery/2025-04/1745653904-k8A3fAAyG8Dt9cqN.jpg)

Display Controls

To change the display settings including the brightness you need to use the side buttons. (also easily accessible if you unscrew the bottom cover)

![](/storage/uploads/images/gallery/2025-04/1745653905-y1mKmEsAbm6Z9MqZ.jpg)

The yellow arrows point to push buttons

The silver upper button is a power switch

The lower control is both a push and up/down button and can be used to enter and control the display options

**Display Options**

When you push the lower button, you will see the display options on screen.

Push a second time to enter a section and push a third time to select the parameter.

Move the lower button up/down to change the value of the selected parameter

![](/storage/uploads/images/gallery/2025-04/1745653905-ZKKVrhrG3udq4gip.jpg)

<p class="callout info">Alternatively, for Windows, Twinkle Tray lets you easily manage the brightness levels of multiple monitors: [https://twinkletray.com/](https://twinkletray.com/)</p>

# 5. Cable Recommendations

<span dir="ltr">If you need to purchase new cables from the market here are some suggestions that work well for </span>MIDI USB and Touchscreen Data, for Macs and Windows PCs.

> <span dir="ltr">Please note that for the display we recommend using USB-C 1m cables and if more length is needed use a powered docking station or powered USB hub. Using cables of more than 1m in length will create more resistance and put more stress on your computer's USB port.  
> </span><span dir="ltr">For HDMI and MIDI USB-C you can use longer cables, 2m or 3m.</span>

##### **<span dir="ltr">USB 3.1 Gen 2 (USB-C to USB-C)</span>**

[<span dir="ltr">AmazonBasics USB-C 3.1 Generation 2 to USB-C Cable</span>](https://www.amazon.de/-/en/Amazon-Basics-USB-C-Generation-Cable-black/dp/B085SBNFQW?th=1)

[Baseus USB C Cable, 100W 5A PD QC 4.0](https://www.amazon.de/-/en/Baseus-Charging-MacBook-Nintendo-Samsung/dp/B07TXJ6R1C/)

[INIU USB-C-Cable, 100 W, 20 V/5 A, PD QC 4.0](https://www.amazon.de/-/en/USB-C-Cable-Charging-Braided-Charger-MacBook/dp/B08J41QTNN)

[Fasgear 5A 100W Type C Right Angle Cable, 6ft USB 3.1 Gen 2 10Gbps](https://www.amazon.co.uk/gp/product/B08FXZLHJ9/)

##### **Thunderbolt 4 (USB-C to USB-C) (best option for connecting the display on thunderbolt)**

[Amazon Basics USB-C to USB-C 4 Fast Charger Cable, 40 Gbps, 8K Video, 240W, USB-IF Cert, Thunderbolt 4/3 Compatible](https://www.amazon.com/Amazon-Basics-Charging-Thunderbolt-Compatible/dp/B0C93G2M83?th=1)

[Caldigit Thunderbolt 4 Cable](https://www.caldigit.com/thunderbolt-4-usb-4-cable/)

[OWC Thunderbolt 4 Cable](https://www.owcdigital.com/products/thunderbolt-4-usb-c-cable)

[Cable Matters 40Gbps USB4 Thunderbolt 4 Cable with 8K Video and 100W](https://www.amazon.com/Thunderbolt-Certified-Cable-Matters-Charging/dp/B08KSM2FWR)

##### **<span dir="ltr">Thunderbolt 3 (USB-C to USB-C)</span>**

[Belkin Thunderbolt 3 Cable](https://www.belkin.com/us/cables/data/thunderbolt-3-cable-usb-c-to-usb-c-3-3-ft-1-m-usb-type-c/p/p-f2cd081/)

[Thunderbolt 3 Cable 40Gpbs/100W/5A,Cabletime](https://www.amazon.com/CABLETIME-Certified-Thunderbolt-Supports-Compatible/dp/B083TVNL8N)

[Apple Thunderbolt Cable](https://www.apple.com/shop/product/MQ4H2AM/A/thunderbolt-3-usb%E2%80%91c-cable-08-m)

##### **USB-A to USB-C   
(only for MIDI, Touch data, Power the monitor but not video signal for video use HDMI)**

[Amazon Basics - USB C Cable to USB Type A, USB 3.1 2nd Gen USA ](https://www.amazon.com/dp/B01GGKYR2O)

[Amazon Basics - USB C Cable to USB Type A, USB 3.1 2nd Gen Germany](https://www.amazon.de/-/en/Amazon-Basics-Cable-Type-White/dp/B01GGKYS6E)

[Anker Powerline II 90 cm USB C to USB A 3.1 Gen2 Cable Germany](https://www.amazon.de/-/en/Powerline-USB-IF-Certified-MacBook-Devices/dp/B07213D35X)

[Amazon Basics - USB C Cable to USB Type A, USB 3.1 2nd Gen UK](https://www.amazon.co.uk/AmazonBasics-Type-C-USB-Male-Cable/dp/B01GGKYS6E?th=1)

[Belkin - 3.1 USB-A to USB-C Cable (USB-C Cable)](https://www.belkin.com/us/cables/data/3-1-usb-a-to-usb-c-cable-usb-c-cable/p/p-f2cu029/)

##### **USB-C cables with ON/OFF switch**

[RIITOP USB Type-C On Off Switch Cable 1 m 10 Gbps](https://www.amazon.de/-/en/RIITOP-Type-C-Switch-Support-Charge-black/dp/B0DKJCNRLG/)

[RIITOP USB C Extension On Off Cable 1 m 10 Gbps](https://www.amazon.de/-/en/RIITOP-Extension-Supports-Charging-Type-C/dp/B0DCG1Q2XC/)

<span dir="ltr">*The cables mentioned in this page are suggestions* </span><span dir="ltr">*and MP MIDI has no affiliation with them*</span>

# 6. MIDI Controller C1-xMP1 not detected (Controller not connected)

##### <span dir="ltr">Mac: </span>

<span dir="ltr">If the </span><span dir="ltr">C1-xMP1</span><span dir="ltr"> does **not** show up in the System Report &gt; USB, see [<u>**here**</u>](https://kb.mpmidi.com/books/mp-controller-documentation/page/1-mac-controller-not-connected-message)</span>

##### Windows:<span dir="ltr"> </span>

<span dir="ltr">If the C1-xMP1 does **not** show up in the Device Manager, s</span><span dir="ltr">ee <u>[**here**](https://kb.mpmidi.com/books/mp-controller-documentation/page/1-windows-controller-not-connected-message)</u></span>

# 7. Display restarts

##### <span data-identifyelement="496" dir="ltr"><span data-identifyelement="497"><span data-identifyelement="498" dir="ltr">MP Controller display restarts constantly (flickering)</span></span></span><span data-identifyelement="496" dir="ltr">  
  
</span>

The cause for this is that the monitor does not receive enough power.

<span data-identifyelement="507" dir="ltr">These steps may help to resolve the problem.</span>

<span data-identifyelement="655"><span data-identifyelement="656"><span data-identifyelement="508"><span data-identifyelement="657" dir="ltr">- use a different USB port from the computer that provides more power. </span></span></span></span>

<span data-identifyelement="659"><span data-identifyelement="660"><span data-identifyelement="509"><span data-identifyelement="661">- use shorter USB cables (1m recommended cables</span></span><span data-identifyelement="663"><span data-identifyelement="510"> </span><u data-identifyelement="664"><span data-identifyelement="665">[**<span data-identifyelement="511">here in section USB-C to USB-A</span>**](https://kb.mpmidi.com/books/mp-controller-documentation/page/6-cable-recommendations)</span></u><span data-identifyelement="512"> )</span></span></span></span>

<span data-identifyelement="669"><span data-identifyelement="670"><span data-identifyelement="513"><span data-identifyelement="671">- use a powered USB hub</span></span></span></span>

<span data-identifyelement="673"><span data-identifyelement="674"><span data-identifyelement="514"><span data-identifyelement="675">- use a</span></span><span data-identifyelement="676"><span data-identifyelement="515" dir="ltr"> [<span data-identifyelement="516">Y-cable</span>](https://kb.mpmidi.com/books/mp-controller-documentation/page/1-model-1a1a-using-a-y-cable-to-provide-more-power-to-the-display) </span><span data-identifyelement="515" dir="ltr">for Model 1A/1A+ </span></span></span></span>

<span data-identifyelement="523" dir="ltr"><span data-identifyelement="527" dir="ltr">**For model 2A** you can use the additional power port to provide more power using a wall adapter 5V/2A minimum or a power bank as explained [**here**](https://kb.mpmidi.com/books/mp-controller-documentation/page/1-understanding-the-mp-midi-controller-ports)</span></span>

<span data-identifyelement="523" dir="ltr"><span data-identifyelement="527" dir="ltr">**![](/storage/uploads/images/gallery/2025-04/1745653906-NUHQBeSshKVmzbli.jpg)**</span>  
</span>

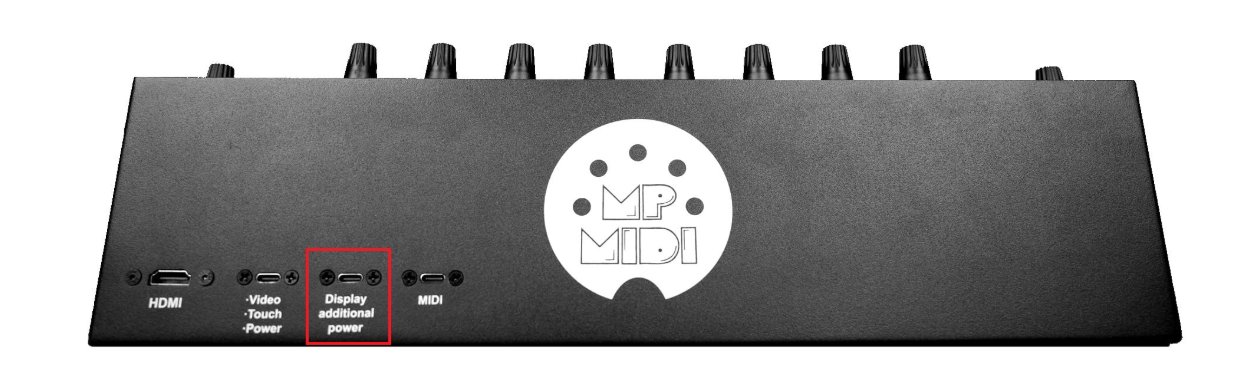
**For model 1A+ and model 2A** If when changing the brightness or switching to a preset with high brightness (such us the FPS) the monitor restarts, it means is not receiving enough power to support the level of brightness.

<span data-identifyelement="523" dir="ltr"><span data-identifyelement="530" dir="ltr">**For mode1 1A+** you also have the option to connect a wall adapter on the internal LCD board which has an additional USB-C port. To get to that port you have to unscrew the bottom cover.</span>  
  
<span data-identifyelement="535" dir="ltr">**For model 1A** use the </span><span data-identifyelement="537" dir="ltr">**[Y-cable](https://kb.mpmidi.com/books/mp-controller-documentation/page/1-model-1a1a-using-a-y-cable-to-provide-more-power-to-the-display)**</span></span><span data-identifyelement="523" dir="ltr"><span data-identifyelement="540"><span data-identifyelement="541" dir="ltr"> to provide additional power.</span></span></span>

# 8. Display does not power On (Mac or Windows)

<p class="callout success"><span dir="ltr">[Here](https://mpmidi.com/connections) are some connection example videos</span></p>

<div dir="ltr" id="bkmrk-"></div><div dir="ltr" id="bkmrk-model-1a%2B%2F2a%3A-when-y"><span dir="ltr">**Model 1A+/2A**</span><span dir="ltr">: When you connect the display USB-C port to power, **it should show the MP MIDI logo** </span></div><div dir="ltr" id="bkmrk-%28as-shown-below%29%C2%A0at-">(as shown below) at boot.</div><div dir="ltr" id="bkmrk--1"></div><div dir="ltr" id="bkmrk-the-display-will-go-">The display will go to sleep in a couple of seconds if there is no video signal, <span dir="ltr">or the video signal received is not 1920 x 1080 resolution at 60Hz refresh rate.</span> </div><div dir="ltr" id="bkmrk--2"></div><p class="callout info">As shown in this [video](https://youtu.be/q9NsGBj-H7s)</p>

![](https://kb.mpmidi.com/storage/uploads/images/gallery/2025-04/1745653906-4q6qvgqtULLPhLaJ.jpeg)

<p class="callout info">**Model 1A:** when connected to power only, after 2 seconds it shows <span dir="ltr">on the display</span> the message "No Signal" and then after 2 seconds the message "Power Saving" and it automatically powers off, if there is no video signal or the video signal received is not 1920 x 1080 resolution at 60Hz refresh rate.   
If you don't see the "No Signal" message and you are uncertain whether your computer's USB port can provide enough power, connect a wall adapter 5V/2A (or more amps) - like a typical phone charger - and it should show the message "No Signal". This shows that the display receives enough power. Connect the HDMI and when it receives video signal.  
  
If the display is connected to a wall adapter and you are certain it provides 5V/2A, but the display is still not showing anything, you may have an issue with the controller display or a damaged bridge port. [Contact us](https://mpmidi.com/contactus) for servicing instructions.  
  
If the display shows video but restarts frequently (flickers), it means you need to provide more power, see the guide [here](https://kb.mpmidi.com/books/mp-controller-documentation/page/1-model-1a1a-using-a-y-cable-to-provide-more-power-to-the-display)  
  
</p>

---

##### Providing Power to the display (Model 2A)

Power can be provided by either USB-C ports of the display. (but **not** the far right USB-C MIDI port)

![](https://kb.mpmidi.com/storage/uploads/images/gallery/2025-04/1745653907-DdGQ4Ww8GZTV5iuZ.jpg)

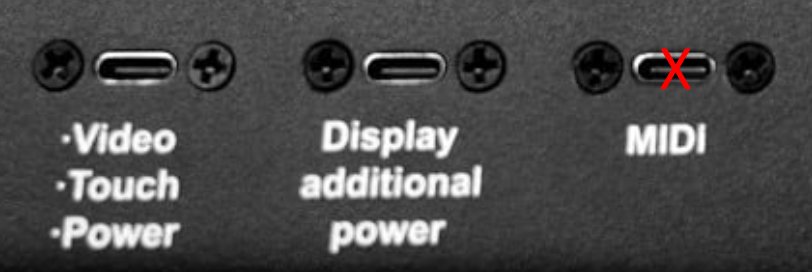
It does **not** need to be connected to a computer to show the logo when it receives power.

It can be connected on a computer or a wall adapter (5V/2A) or power bank on any of the 2 USB-C ports.

<p class="callout info">If you only connect to a computer the "Display additional power" port only and HDMI, (but **not** the Video/Touch/Power port) then the there will be no touch screen functionality.</p>

See video [**<u>here</u>** ](https://www.youtube.com/watch?v=TCrdMa9_66Q)for connection options.

<p class="callout info">Power can be provided via external wall adapter (5V/2A), or USB-C to USB-C   
(thunderbolt on a computer that has thunderbolt USB-C) or USB-C to USB-A</p>

---

##### <span dir="ltr">Black Screen, nothing is shown when connected to power</span>

<div id="bkmrk-if-you-don%27t-see-any">If you don't see anything on the display and it is entirely a black screen here are the possible causes of the problem:</div><div id="bkmrk--8">  
</div><div id="bkmrk-1.-you-have-turned-i">**1. You have turned it off from the remote control (model 1A+/2A).** </div><div id="bkmrk-after-connecting-the">After connecting the power USB-C cable, point the remote control to the IR receiver of the unit and press he power button on the remote control.</div><table id="bkmrk--9"><tbody><tr><td dir="ltr">![](https://kb.mpmidi.com/storage/uploads/images/gallery/2025-04/1745653907-W9nkj9IOXYQoohLV.jpg)</td><td>![](https://kb.mpmidi.com/storage/uploads/images/gallery/2025-04/1745653908-zwUVGwVRCVg05IoF.jpg)</td></tr></tbody></table>

<p class="callout info">
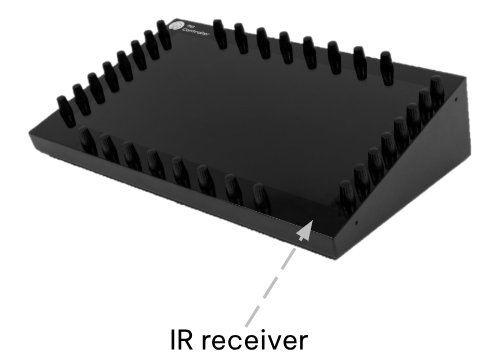
Here is how to check that the remote control is working properly and does not need a new battery.   
The remote control light is infrared and can't be seen.   
Go into a relatively dark room and open your mobile/cell phone camera.   
Point the remote to the camera, and press a button on the remote control.  
You would see a light blinking in the camera.  
See instructional video [here](https://drive.google.com/file/d/1VAJktDCLZiq-y-Zf6PxZPnfpTir_w-BE/view?usp=sharing)</p>

<div id="bkmrk-2.-the-display-is-no">**2. The display is not receiving enough power.**</div><div id="bkmrk-this-sometimes-may-b">This sometimes may be caused by using long cables, for example, more than 1m long. Use a shorter, high quality DATA cable to power the display. [**<u dir="ltr">Here</u>**](https://kb.mpmidi.com/books/mp-controller-documentation/page/6-cable-recommendations) are some cable suggestions.</div><div id="bkmrk-3.-broken-bridge-por">**3. Broken bridge port on the enclosure.**</div><div id="bkmrk-model-1a%2B%2F2a%3A%C2%A0you-ca">**Model 1A+/2A: You can bypass the bridge port mounted on the enclosure of the unit, by connecting a USB-C cable to the LCD board directly. To reach the LCD board you need to unscrew the bottom cover.</div><p class="callout info"><span dir="ltr">**Model 1A:** You can bypass the bridge port mounted on the enclosure of the unit, the unit must be disassembled as the LCD board is mounted inside the display. [Contact us](https://mpmidi.com/contactus) for servicing instructions.</span></p>

<div id="bkmrk--13">  
</div><div id="bkmrk-4.-disconnected-cabl">**4. Disconnected cables inside the unit, on the LCD board.** </div><div id="bkmrk-unscrew-the-bottom-c">Unscrew the bottom cover. Then unscrew the LCD board and check that all the cables are properly connected.</div><div id="bkmrk--14">  
</div><div id="bkmrk-5.-model-1a%2B%2F2a%3A%C2%A0bro">**5. Model 1A+/2A: Broken LCD board.** </div><div id="bkmrk-the-lcd-board-has-le">The LCD board has LEDs that should light up when connected to power. Unless it has been powered off by the remote control. It should be either be powered ON using the remote control or the buttons on the IR receiver board (inside the unit)</div><div id="bkmrk--15">  
</div><div dir="ltr" id="bkmrk-6.-broken-display.%C2%A0">**6. Broken display.** </div><div dir="ltr" id="bkmrk-after-testing-everyt">After testing everything above, in this case the display needs to be replaced.</div>

# 9. Model 2A/1A+ - Setting the language on the display menu

To change the language on the display OSD menu, see[ this video.](https://drive.google.com/file/d/1iaTOS6WOAsRnPS229oNp0n5UuaV_US8Q/view?usp=sharing)

# 10. Tightening encoders on Model 2A

<div id="bkmrk-it-is-easy-to-do-it-">It is easy to do it and in fact we have designed the controller in such a way so that encoders can be replaced easily without the need of soldering or a technician.</div><div id="bkmrk-this-makes-the-contr">This makes the controller easy to repair and maintain when needed.</div><div id="bkmrk-">  
</div><div id="bkmrk-remove-the-top-knob-">Remove the top knob top cup by pulling it gently from its base.   
You will see the encoder and at its base a nut.   
That is the nut that needs to be tightened.</div><div id="bkmrk--1">  
</div><div id="bkmrk-unscrew-the-bottom-c">Unscrew the bottom cover. It is ok to unscrew the bottom cover because the MP Controller is made to be rack mounted and you can pass all the ports from the bottom hole on the cover.</div><div id="bkmrk--2">  
</div><div id="bkmrk-hold-that-encoder-wi">Hold that encoder with your fingers from the inside so that it does not turn and use a 10 or 12 <span class="il">key</span> tool to gently tighten it a bit. </div><div id="bkmrk-not-too-much%2C-just-t">Not too much, just to feel it is tight enough.</div><div id="bkmrk--3"></div><p class="callout info">Download an instructional video from [here](https://drive.google.com/uc?export=download&id=134HpLAkotL6z4RKvRTU90rFTzOltEPm2)</p>

<div id="bkmrk-place-the-back-cover">Place the back cover on and screw it back, place the knob cap and this is it.</div>

# 11. Using the Remote Control

<div id="bkmrk-after-connecting-the"> Point the remote control to the IR receiver of the unit and press he power button on the remote control.</div><table id="bkmrk--8"><tbody><tr><td dir="ltr">![](https://kb.mpmidi.com/storage/uploads/images/gallery/2025-04/1745653907-W9nkj9IOXYQoohLV.jpg)</td><td>![](https://kb.mpmidi.com/storage/uploads/images/gallery/2025-04/1745653908-zwUVGwVRCVg05IoF.jpg)</td></tr></tbody></table>

<p class="callout info">Here is how to check that the remote control is working properly.  
The remote control light is infrared and can't be seen.   
Go into a relatively dark room and open your mobile/cell phone camera.   
Point the remote to the camera, and press a button on the remote control.  
You would see a light blinking in the camera.  
See instructional video [here](https://drive.google.com/file/d/1VAJktDCLZiq-y-Zf6PxZPnfpTir_w-BE/view?usp=sharing)</p>