9. Troubleshooting - Mac OS
Guides on how to diagnose and troubleshoot issues on Mac OS
- 1. Mac - "Controller Not Connected" message
- 2. Mac - License not Found
- 3. Mac - Model 1A: Troubleshooting the Touch Function
- 4. Mac - Model 1A+/2A : Troubleshooting the Touchscreen
- 5. Mac - Model 1A+/2A - Display powers ON but goes to sleep - Power Saving and No Signal
- 6. Mac - The MP Host Window appears on another display
- 7. Mac - Installed Plugins not shown in the Plugin List
- 8. Mac - Troubleshooting in depth the C1-xMP1 MIDI Controller
- 9. Mac - "Invalid mph.license" message
- 10. Mac - C1-xMP1 not showing up in the System Report
- 11. Apple could not verify the installer. How to open the installer.
1. Mac - "Controller Not Connected" message
The MP Controller has a separate hardware module for MIDI.
This hardware is seen on the Mac’s System Report as C1-xMP1. The device is class compliant and does not need any drivers.
The "Controller not connected" message refers to the C1-xMP1 hardware module device.

First, ensure that you have the MIDI port connected to the computer:

Like all USB devices, the C1-xMP1 must be initialized by the Mac and it will be displayed in the System Report of the Mac.
If a USB device is not listed under the USB tree of the System Report, the device is either not connected to the Mac or it has a hardware/connection problem.
There is no need to check the MIDI Studio if the C1-xMP1 does not show up in the System Report. If it is not listed in the System Report, it will definitely not be displayed in the MIDI Studio.
If the C1-xMP1 device is listed in the System Report but you still get the message "Controller not connected" then it is a software related issue. See step 2 of the troubleshooting steps below. If the device is listed and displays [Safe Mode] it is ok and it does not affect the function of the device.
The Mac's System Report needs to be reopened to show newly connected devices. Alternatively, you can open a terminal and paste this command
system_profiler SPUSBDataType | grep -i "C1-xMP1"
If it is connected it will print: C1-xMP1. If not, it will not print anything.
While on the terminal pressing the up arrow on the keyboard and enter will repeat the command
IMPORTANT: If you have UPDD installed and the C1-xMP1 is listed in the System Report but not found in the Mac MIDI Studio, it is possible that some setting/selection in UPDD is causing this.
Uninstall UPDD and reboot the Mac. Check the MIDI Studio if C1-xMP1 is listed and online
Please note, UPDD does not need any hardware selection setting to be done manually.
It should work without any manual configuration.
Steps to Troubleshoot
-
Check in the System Report that the C1-xMP1 shows up.
(Not to be confused with MP Touch screen hardware)
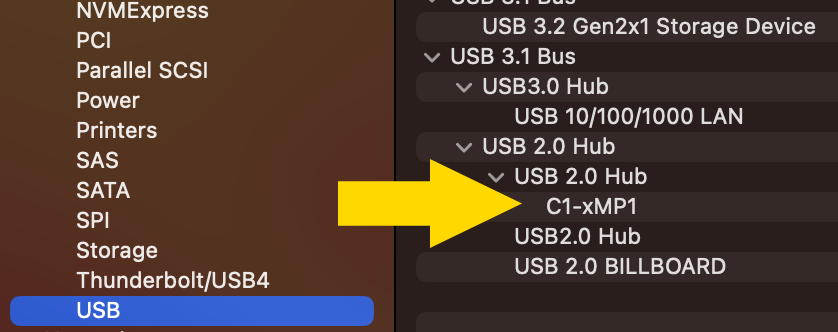
If it does not show up, there is a connection issue. Connect the cable provided directly from the MIDI port of the controller, to the computer’s USB A port (not USB-C port).
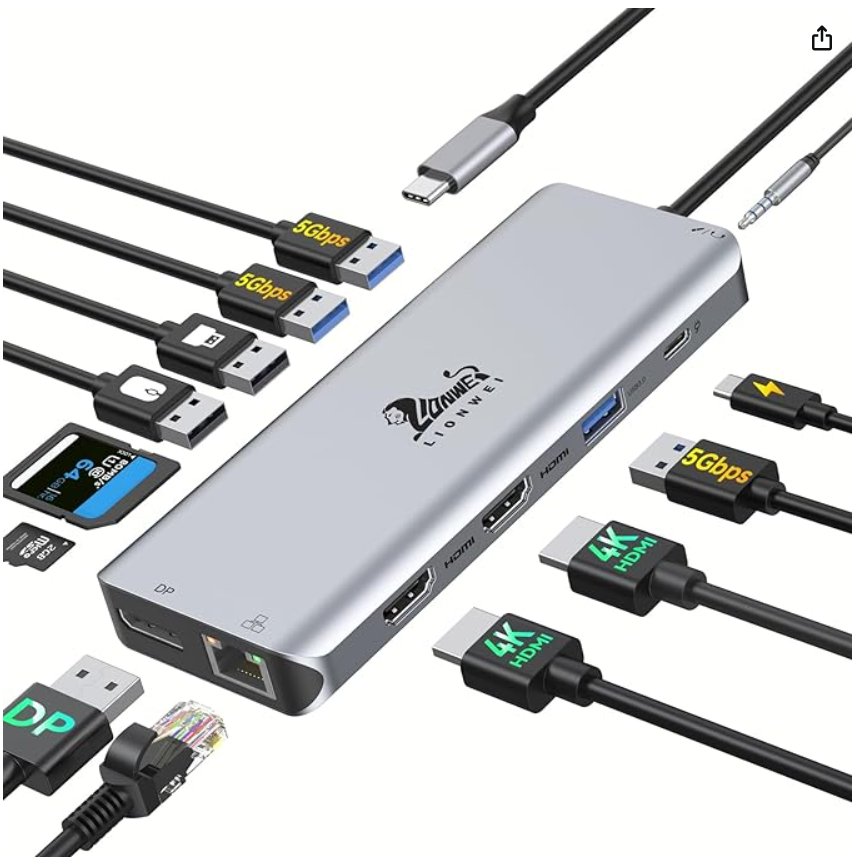
If don't have a USB-A port of your Mac connect it via a USB-C docking station like this that has USB 2.0 and USB 3.0 ports.
If it still does not show up in the System Report, See this article
-
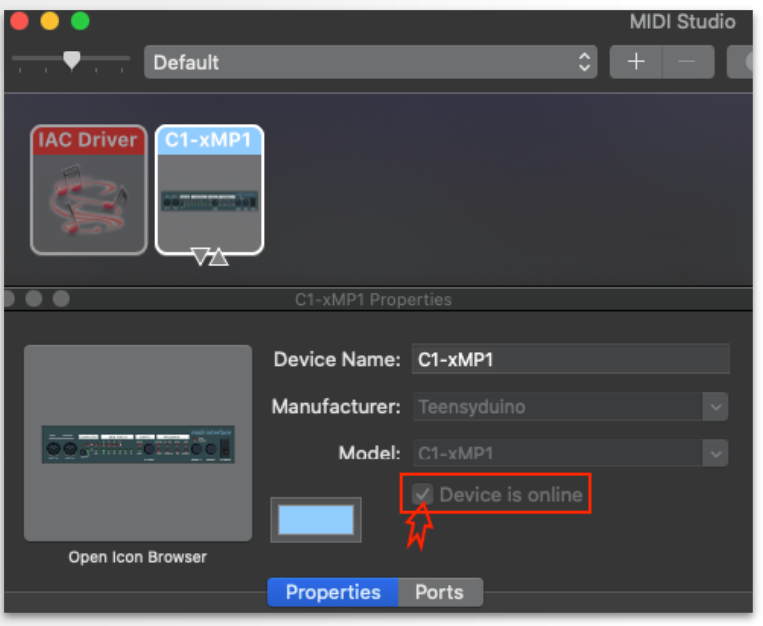
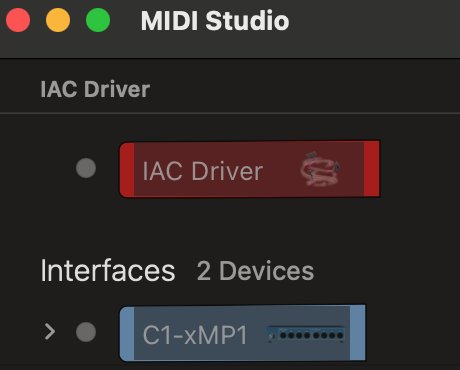
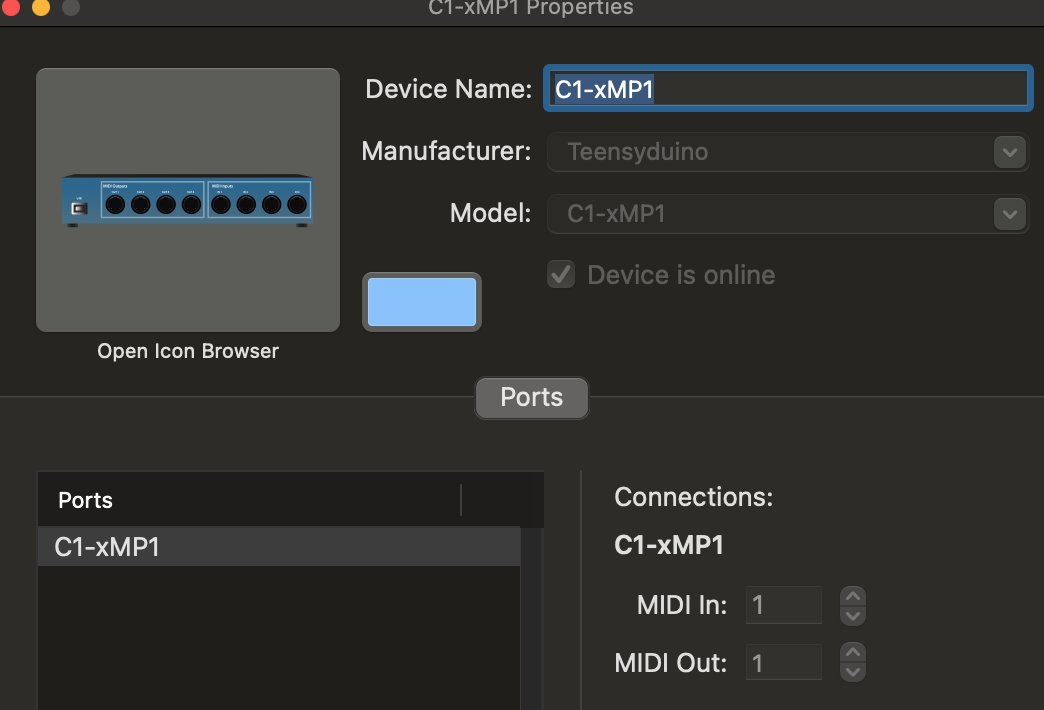
If it does show up in the System Report, then make sure that it shows up and that it is active and online in MAC’s MIDI Studio. (Do not rename the C1-xMP1 in MIDI Studio on the Mac) as shown in the screenshot below.
If you have more than one C1-xMP1, delete the additional one.
If the C1-xMP1 does not show up in the MIDI Studio, try Refresh MIDI Setup from the top bar menu option.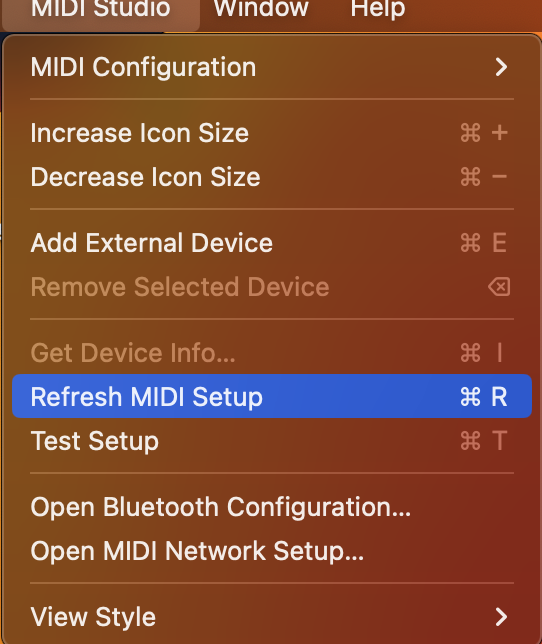
and try pressing the Rescan MIDI button

- Disable the MIDI In/Out of the C1-xMP1 in the DAW as instructed here. The controller should now be found by the MPH plugin shown on the left bottom of the MPH plugin window.
Logic Pro configuration
If you are using the Logic Pro Control Surface, it requires that the MIDI port for C1-xMP1 to be enabled under MIDI INPUTS in Logic. Therefore, enable it and Logic will still be able to use it. This is because macOS allows MIDI ports to be shared. See here to disable the C1-xMP1 from sending MIDI CC directly to Logic. This way you allow the MIDI port to be used for the Control Surface but at the same time prevent it from sending unwanted MIDI CC messages to Logic directly.
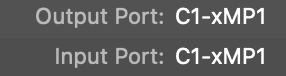
If it does show up in the MIDI studio and you are in Logic Pro go to
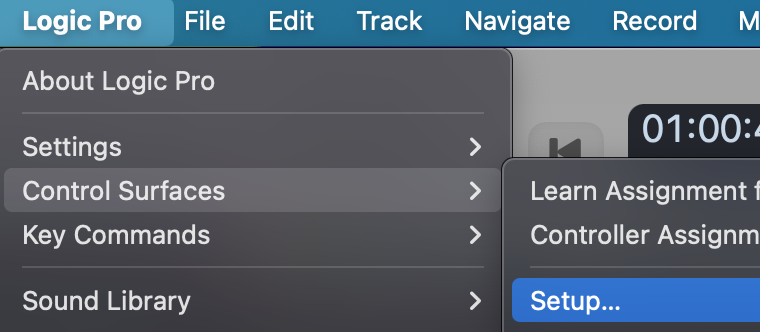
and check that no other control surface has the C1-xMP1 selected in its input/output port (except the MP MIDI if you have the Logic Control Surface installed). If some other control surface does have C1-xMP1 MIDI ports selected, deselect it or delete the control surface and restart Logic Pro.
2. Mac - License not Found
The “License not found” will appear if the file mph.license and/or hardware.id files are missing from the /MP/Host folder.
Or if using a Mac OS older than MacOS Mojave.
You can use the License Manager application (recommended) to create a new license. Download it from the user portal.
If the license manager fails on the mac because of a permissions error such as "need permission to write files" you can paste the following in a terminal and enter your password, and press enter:
mkdir -p ~/Library/Application\ Support/MP/Host
sudo chown $(whoami) ~/Library/Application\ Support/MP/Host
sudo chmod -R 777 ~/Library/Application\ Support/MP/Host
Alternatively, log on to the user portal and download the latest version of the MP Host plugin.
Follow this guide to generate a license.
The hardware.id file is generated automatically when you run the MP Host plugin. This is the hardware id of your computer.
The mph.license file should be downloaded from the user portal.
Details on how to log in to the user portal have been emailed to you.
First, ensure you have both files in the MP Host folder as shown here:

Do not rename the hardware.id and mph.license files.
If the filenames are not exactly as shown above, you will get the error "License not found"
Hardware.id file is not being copied to the Mac's Desktop
If you are using the MP Controller for the first time on a Mac and the hardware.id file is not being copied to your Desktop when you click on the STEP 1 button in the license registration, click on the Open the MP Host Folder button on the Licence Management window. It will open the folder in your Mac's Finder.
Close the DAW.
Alternatively you can open the following folder in Finder. On the top menu of the Finder on your Mac, choose Go > Go to Folder and paste this path: ~/Library/Application\ Support/MP/Host
Once the folder is open, check if the hardware.id file present in the MP Host folder.
If it is not present, strict permissions by MacOS may be the issue.
Paste the following in a terminal:
sudo chmod 777 ~/Library/Application\ Support/MP/Host
It will ask for your password and then enter.
The terminal should not produce any output. If it produces a message then there may something wrong with the command provided. Take a screenshot of the message and send it to us via email.
Then open you DAW and load the MPH Single plugin and follow the steps to complete the license generation/verification process by clicking on Step 1 button.
Additionally, it is a good practice to add the DAW in System Settings > Privacy and Security > Full Disk Access.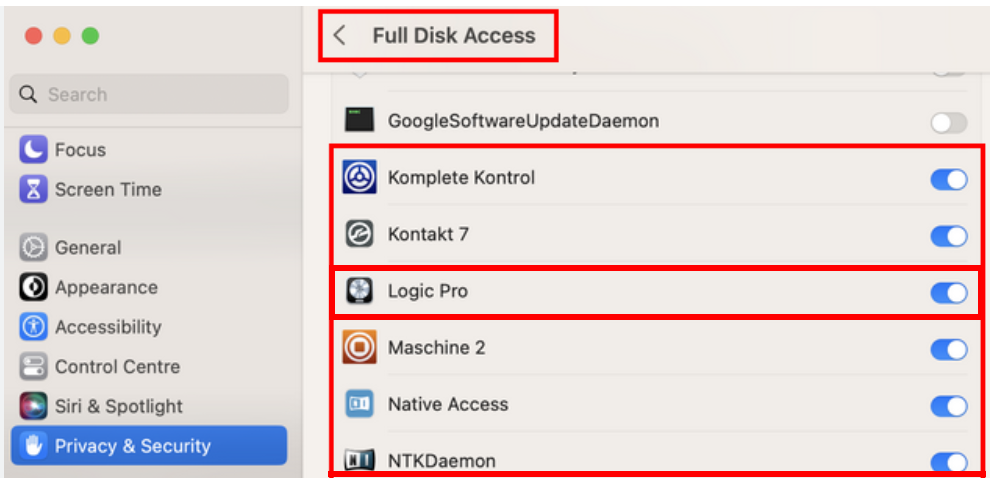
Note that without the mph.license file the MP Host plugin will not allow the hardware controller to be connected to the MP Host software and the encoders will not work.
3. Mac - Model 1A: Troubleshooting the Touch Function
UPDD needed for Mac OS Catalina and Onwards
The touchscreen works as mouse input, therefore when you touch the screen it gets the mouse cursor. If you touch and drag, it behaves in the same way as clicking and dragging with the mouse.
In Mac OSX Catalina 10.15.4, Apple replaced the way hardware interacts with the OS. It introduced the new Driverkit and replaced the traditional Kexts with Dexts.
You can get the Mac OS software from https://touch-base.com/controllerbyte and you can also download a demo to try it prior to purchasing.
There are 2 possibilities for why the touch screen is not working on the Mac (while video is being displayed and the monitor is ON):
1. Is a software issue with the UPDD software on the Mac. (Usually this is due to permissions) OR
2. A connection issue.
To find out what is going on, first check under USB in the System Report: Multi-Touch by G2TSP (the touchscreen hardware.
The C1-xMP1 is the MIDI Controller hardware.
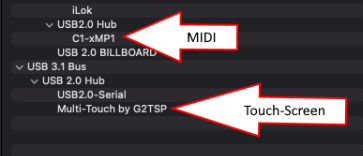
The two devices (G2TSP and C1x-MP1) work independently and are not related to each other. The C1-xMP1 does not need to be connected for the touch screen to work.
This test app was created for convenience, it just detects the G2TSP touch hardware and displays it, just as it would on the System Report. Therefore, opening the System Report or the test app is the same.
Alternatively instead of opening the System Report every time try this command in the Mac OS terminal:system_profiler SPUSBDataType | grep -i "Multi-Touch by G2TSP"Press enter. It should output "Multi-Touch by G2TSP" if it is found.
If it does not show anything it means it is not registering with Mac OS and it is a hardware or connection issue.To repeat the command, press the up-arrow and then enter.
If you can't see the Multi-Touch G2TSP in the test app or the MacOS System Report, then it means that there is a connection or hardware problem. The System Report will display Multi-Touch G2TSP even if UPDD is not installed.
The only port on the MP MIDI Controller that affects the touch function is the Display Port on the Controller. The only cable that affects the touch function is the USB cable connected to the Display Port and on the Mac computer on the other end.
If connected via a usb hub, try to connect it directly on the Mac.
Use the 1m cables provided with the controller.
If your controller came with 2m cables, the best cable to use from the market is the 1m Amazon Basics Cable USB 3.1 Gen 2.
Here are links for: USA, UK, Germany
The best recommended connection method is using HDMI and the provided USB-C to USB-A cable directly connected on the Mac. (When the HDMI is disconnected the display goes to sleep in 3 seconds)
If you see the G2TSP in the test app or system report, then run the diagnostic from Touch Base and email it to their support address.
If you have it connected on the Mac with the 1m USB cable (USB-C or USB-A) and the Multi-Touch by G2TSP does not show up in the System Report (after you get a disconnection message from UPDD) then the next thing to check is the ports on the enclosure which may be causing the problem. These can be bypassed and connect directly on the LCD panel, however, to get to the port of the display the unit must be disassembled by removing the bottom cover.
4. Mac - Model 1A+/2A : Troubleshooting the Touchscreen
You need Mac OS Mojave or above for the touch function to work.
UPDD does not have to be installed for the Mac OS to detect the Touchscreen hardware.
First, we need to check if the Mac OS finds the Touch hardware.
Follow these steps:
1. Connect USB-C to USB-A cable directly to the Mac’s USB port without going through a hub or the Y-cable or any other middleware.
2. Then connect the HDMI for video signal (if there is no video signal the monitor will power off).
Alternatively to the hdmi, you can try a Thunderbolt (USB-C to USB-C) cable directly on the Mac, but the best method to test is with the provided USB-A cables.
3. Open the System Report of the Mac and check under the USB Tree, it should display
----------------------------------------------------------------
MP Touchscreen
Manufacturer: MP Controller Touch Display
----------------------------------------------------------------
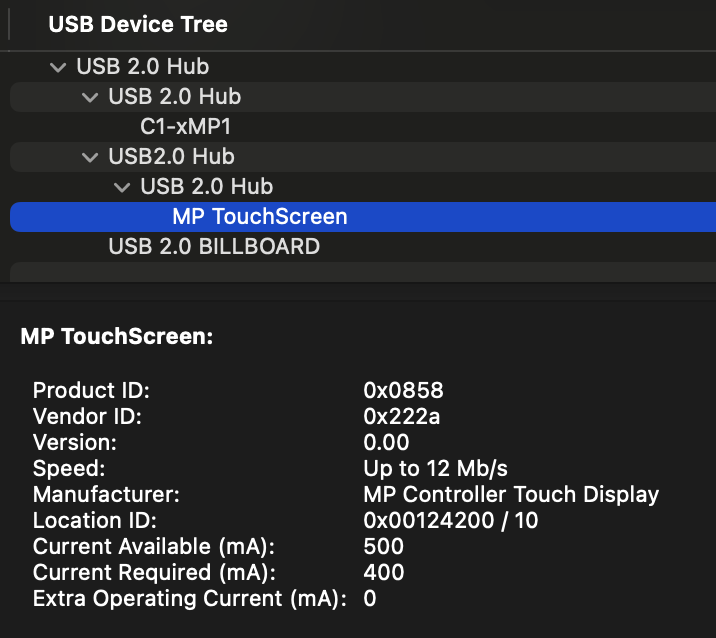
Alternatively to opening the System Report (needs to reopened every time you unplug a USB device), you can download 'this' small utility app (right click and click "save link as..." to download it) which when you run it, it shows if the MP Controller’s touch software is properly connected and found by Mac OS.
Please note that the cursor of the mouse must be on the MP Controller for the touch function to work properly . If it located on your main monitor and when you touch the screen it will move the mouse in the main screen. UPDD transfers the touch on the MP Controller screen area automatically, regardless of the position of the mouse.
For further information on UPDD see this article
5. Mac - Model 1A+/2A - Display powers ON but goes to sleep - Power Saving and No Signal
If the display powers on and shows the logo but short after powers off (sleep mode), this confirms that the display of the controller receives power, however
-
no video signal is being received from the computer or
-
the video signal is not of the correct resolution and/or refresh rate
This is a standard behavior on all monitors connected to computers when they don't receive video signal.
If the display restarts constantly, then the problem is not enough power provided to the MP Controller display port,
see this article
If the display does not power ON at all see this article (no MP MIDI logo on startup)
![]()
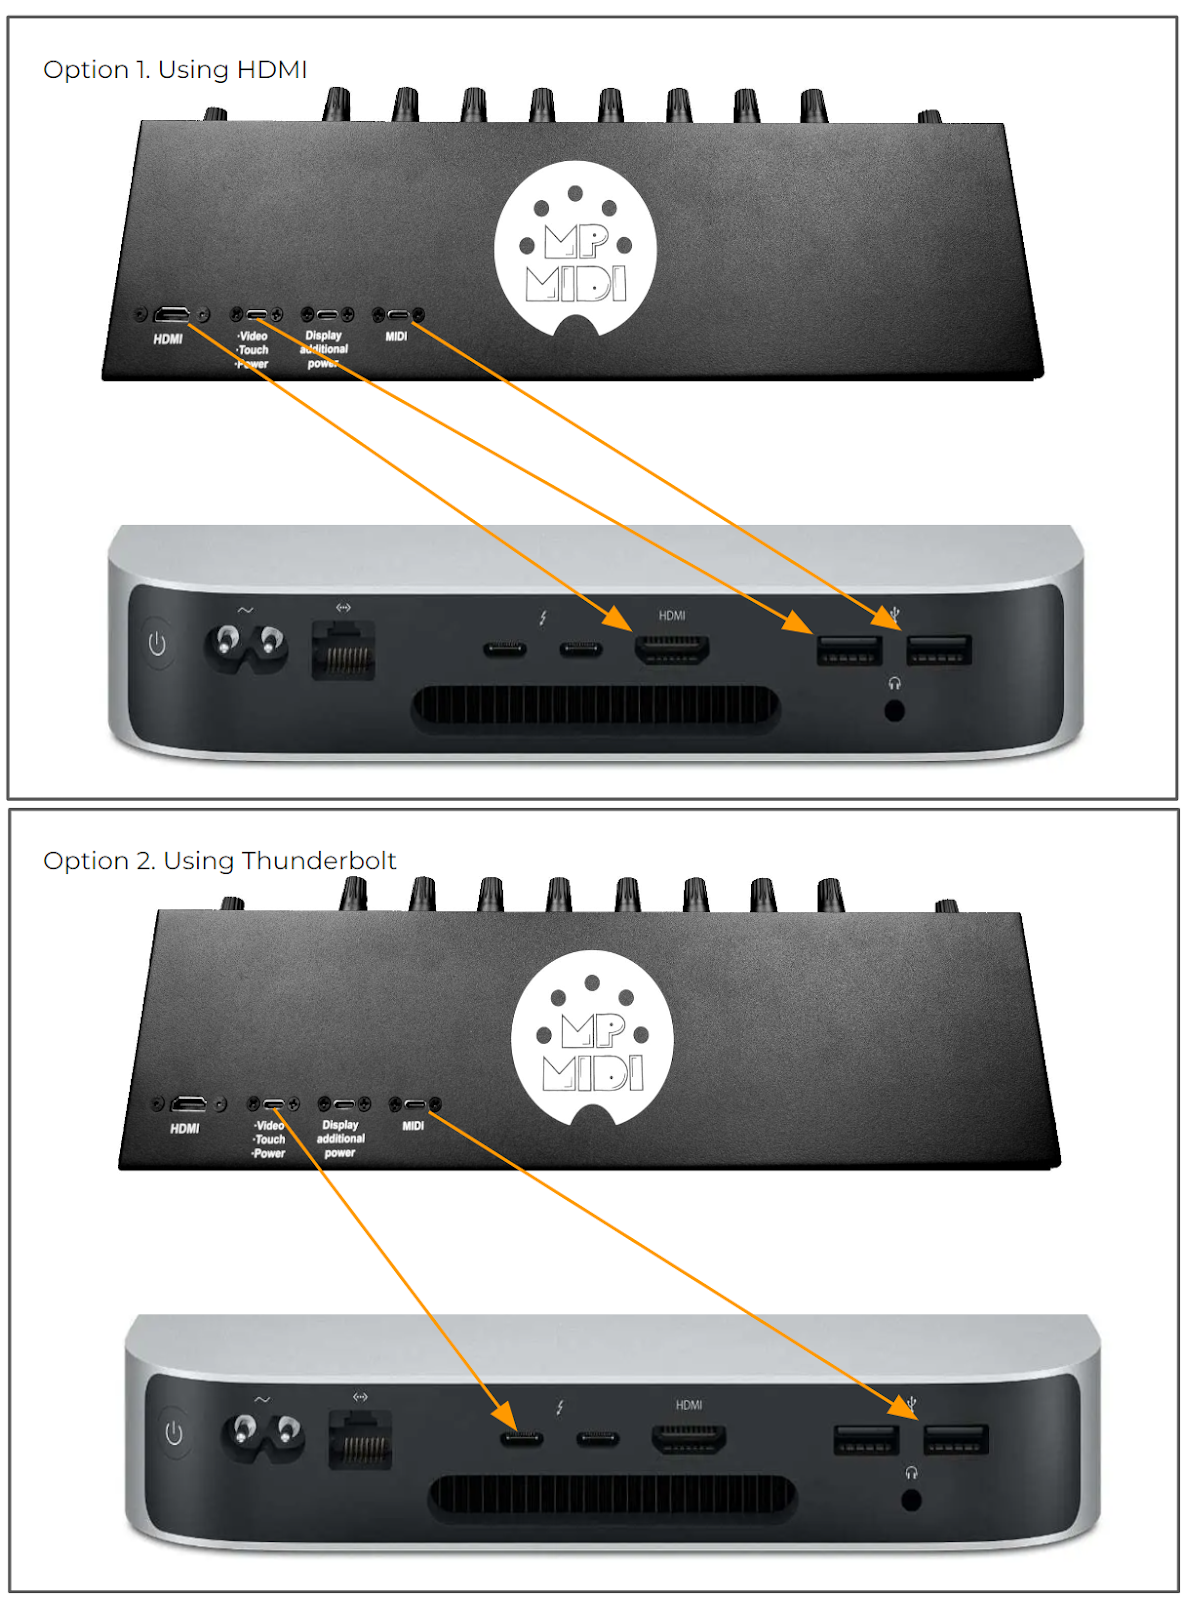
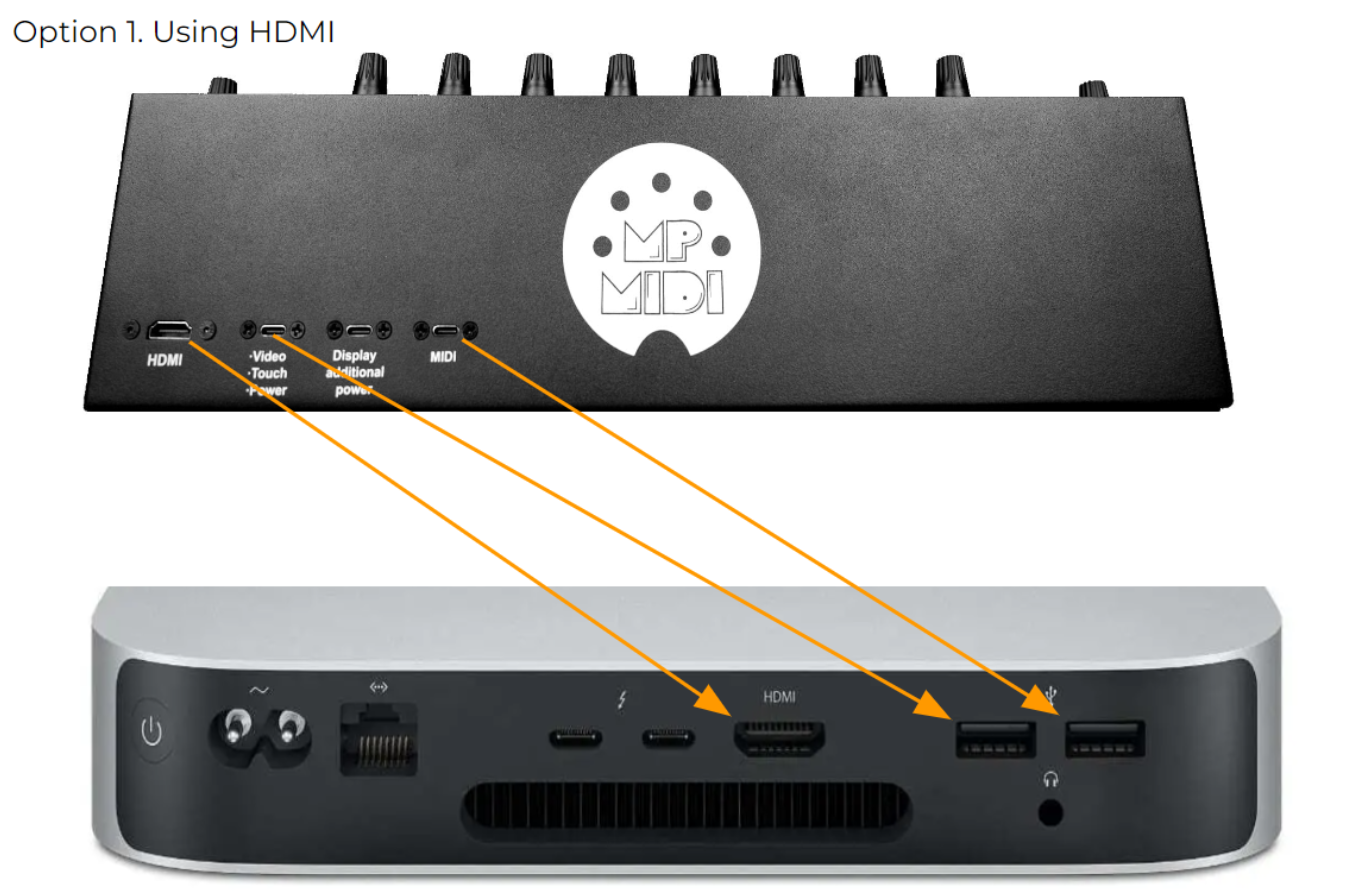
Connection Options
Connect the cable to the Display port (Video, Touch Power), by following one of the 2 connection options,
-
Thunderbolt: USB-C to USB-C or
-
HDMI: USB-A and HDMI.
See the connection diagrams on the initial setup guide.

This port should always be connected, either with USB-C to USB-A when using HDMI, or USB-C to USB-C when using thunderbolt.
Not all USB-C ports are the same on newer Macs. USB-C ports on some models placed in the front panel of the Mac are plain USB ports which do not provide a video signal. Ensure you are using Thunderbolt ports (usually at the back).
For Apple Silicon Macs models made after 2022, to connect via Thunderbolt (For Video, Touch, Power) we recommend purchasing a 1m Thunderbolt 4 cable, for example
Amazon Basics USB-C to USB-C 4 Fast Charger Cable, 40 Gbps, 8K Video, 240W, USB-IF Cert, Thunderbolt 4/3 Compatible
(Note that, the MIDI port connection is still needed for MIDI communication)
Note: The "Display additional power" port will not transfer video signal when connected and it should only be used to provide additional power. If you connect only this port, the display of the controller will go into power saving and display the "No Signal" message
![]()
Changing the Refresh Rate
If the display of the controller is shown after connection in the System Settings > Displays, the monitor frequency should be automatically set to 60Hz.
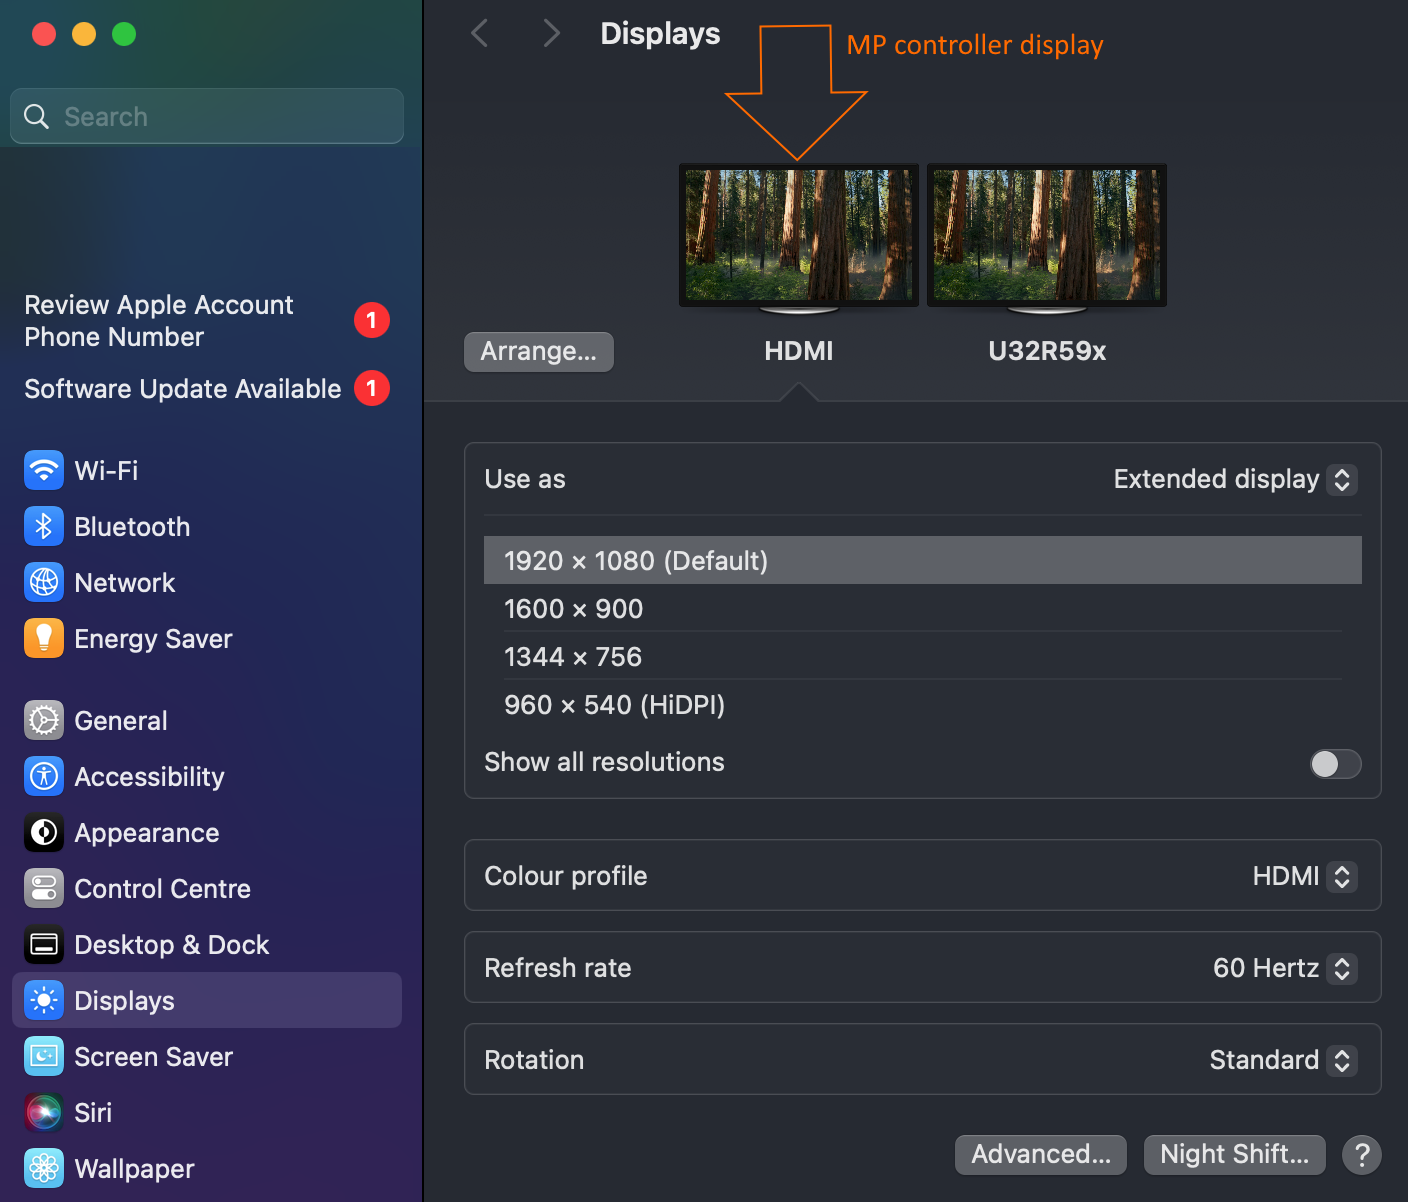
In some cases, the Mac OS may set it to 75Hz and this will cause the display of the MP Controller to go to sleep.
The refresh rate settings on MacOS are hidden — In Display Settings, be sure to hold the Option key when clicking "Scaled" to see the refresh rate option.

See video how to change the refresh rate on MacOS Sonoma
The resolution of the monitor should be set to 1920 x 1080,.
Set the monitor as external display in Displays on the Mac. (not mirror)
If you are connecting the controller's display using USB-C thunderbolt and it does not show as an additional display in the System Settings > Displays, then it means the Mac OS cannot recognize the display. This may be due to a number of factors depending on Mac model and thunderbolt generation. In this case connect the display using HDMI as shown in the next section.
Also see: MacOS 13.4 Ventura - External Monitor no longer detected. Worked until the update to 13.4 https://discussions.apple.com/thread/254875167?sortBy=best
![]()
Mac not able to provide video signal via Thunderbolt
If using the USB-C Thunderbolt port on your Mac and it is unable to provide video signal to the MP Controller which consequentially the display goes to sleep, then connect it using HDMI and USB-A as shown below.
If your Mac is unable to provide video to the display using USB-C thunderbolt, you may still be able to use USB-C to USB-C for touch/power and HDMI for video.
If you don't have an HDMI port and USB ports available on your Mac, you should use a USB-C powered docking station. See some suggestions here
If you have multiple displays connected to your Mac, ensure that your Mac has the ability to provide video signal to the number of displays you have connected including the MP Controller. For example, the Mac Mini M1 can only use 2 displays. You can extend (add more) the number of displays on a Mac by using a Wavlink USB adapter.
![]()
Changing the video input on the display
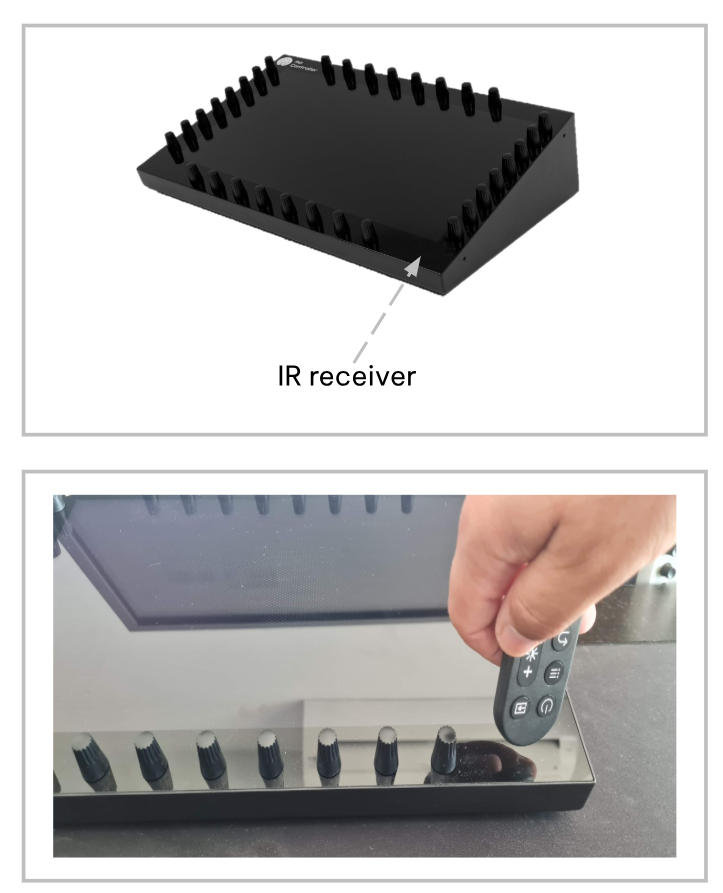
Although the input is selected automatically when detected (HDMI or Thunderbolt via USB-C), when you connect the Display port and the MP MIDI logo comes on, before it goes to Power Saving mode, use the remote control to select the correct input, HDMI or TYPE-C.
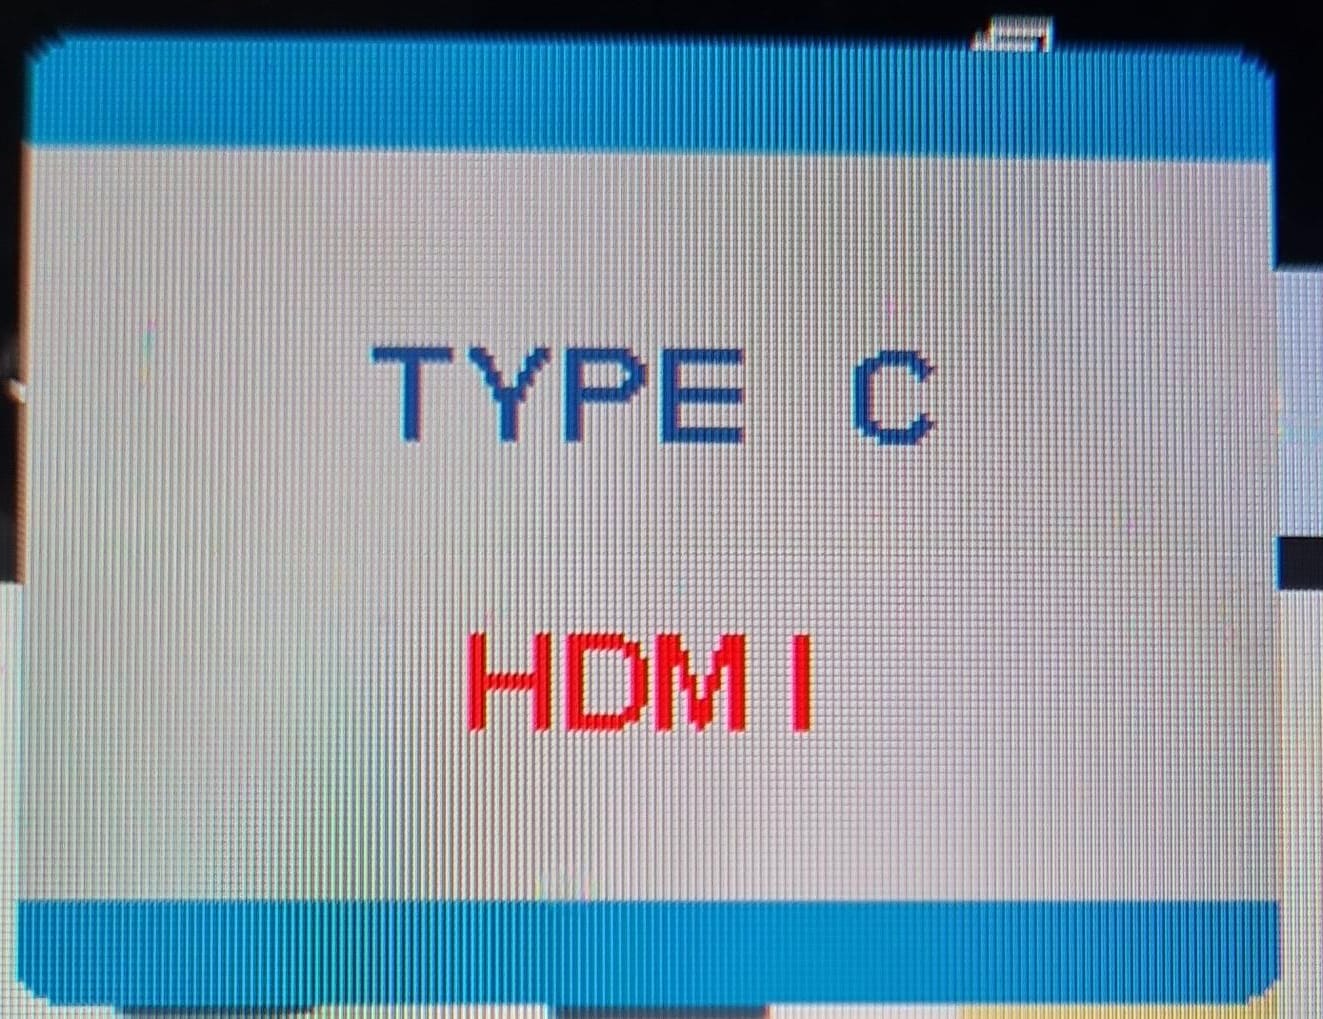
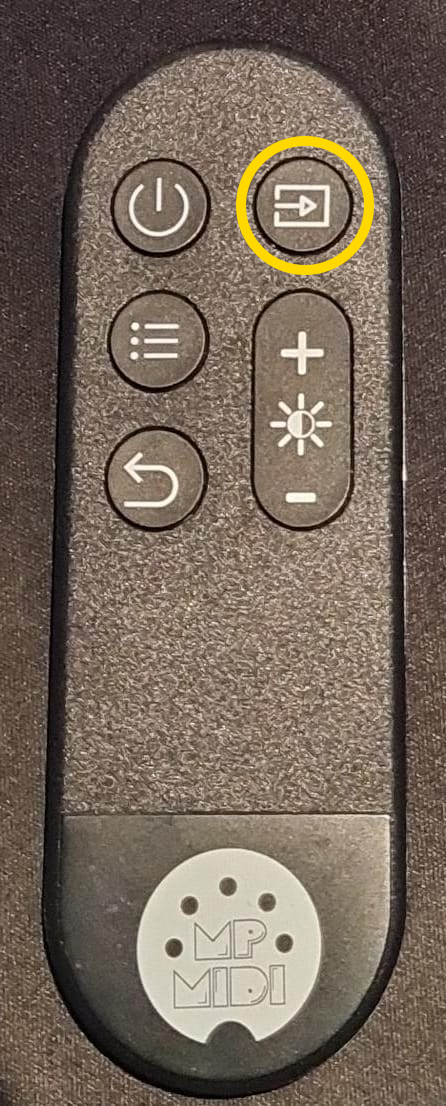
Note that the remote control must be pointed to the remote receiver on the controller.
Using long cables when the computer is not close to the controller
https://kb.mpmidi.com/books/
6. Mac - The MP Host Window appears on another display
Ensure you are using the latest MP Host plugin. The method that the target display is chosen has been updated in the 11/2024 version of the MP Host.
On the Mac it is a good practise to go in Mission Control, disable the option “Displays have separate spaces”. This will also remove the Mac OS top menu bar from appearing on top of the MP Host window.
Please note that the target monitor needs to be set once for each: MP Host, MIDI App, Ableton MPH as they are using different setting files.
To select the target monitor see here
7. Mac - Installed Plugins not shown in the Plugin List
The MP host will read the plugin files but not do an in-depth scan like the DAW, so it only takes a few seconds:
- the AU plugins in /Library/Audio/Plug-Ins/Components
- the VST2 plugins in /Library/Audio/Plug-Ins/VST
- the VST3 plugins in /Library/Audio/Plug-Ins/VST3
scanning will read and display just the filenames at first, and fully scan a plugin once you choose to load/use the plugin
If the VST3 plugins are not shown in the MP Host list, navigate to the host.properties folder and rename it or delete it.
Close any MP Host instances you have running and the DAW.
Then reset the permissions on the VST3 folder by running in the Mac terminal:
enter your password and hit enter. It should not produce any output on the terminal.
Then run in the terminal:
sudo chown -R "$(whoami)":staff "/Library/Audio/Plug-Ins/Components"
sudo chown -R "$(whoami)":staff "/Library/Audio/Plug-Ins/VST3"
sudo chown -R "$(whoami)":staff "/Library/Application Support/Avid/Audio/Plug-Ins"
As you may have noticed it has generated a new host.properties file.
For more information please see this article on how the MP Host scans and finds plugins.
Plugins also may be removed from the plugin list (after you scan or try to try to load them once) if they are not universal binaries (Apple Silicon ARM and x86). You can find if a plugin is built for both architectures by running lipo -info PLUGIN_PATH in a terminal
For example: lipo -info /Library/Audio/Plug-Ins/
It is possible to have the plugins in the user Library as well.
This may result in duplicate plugins.
Force Ableton Live to find new plugins on MacOS and Windows
If you have a large number of plugins and Ableton does not show the new version of the MP Host try the following methods:
1. Rescan Plugins in Ableton Live:
- Open Ableton Live.
- Navigate to
Live>Preferences(orOptions>Preferenceson Windows). - In the Preferences window, go to the Plugins tab.
- Click the Rescan button to force Ableton to rescan the plugin folders.
2. Clear Plugin Cache Manually:
- On macOS, the cache files are located in:
~/Library/Preferences/Ableton/Live x.x.x/
- On Windows, the cache files are in:
C:\Users\[Your Username]\AppData\Roaming\Ableton\Live x.x.x\Preferences\
Inside these directories, locate and delete the file PluginScanV2 (this file holds cache data for your plugins).
3. Rescan AU/VST if Using macOS (for Audio Units only):
- If you're using Audio Units (AU), resetting the cache may also involve rescanning AU plugins:
- Open a Terminal and run the following command:
killall -9 AudioComponentRegistrar
- Open a Terminal and run the following command:
This will force the macOS to reload the list of installed AU plugins.
After these steps, Ableton Live should detect the new versions of your VST plugins properly.
8. Mac - Troubleshooting in depth the C1-xMP1 MIDI Controller
The C1-xMP1 is the midi device of the MP Controller.
If it does show up in the System Report but it still does not found by the MP Host plugin then try the following.
Create a new configuration in Mac's MIDI Studio
Click on the dropdown:

Then select New Configuration. This will reset the MIDI studio

You will see the connected MIDI devices
Double click on the C1-xMP1 and you should see that the device is online
Using the Console to diagnose
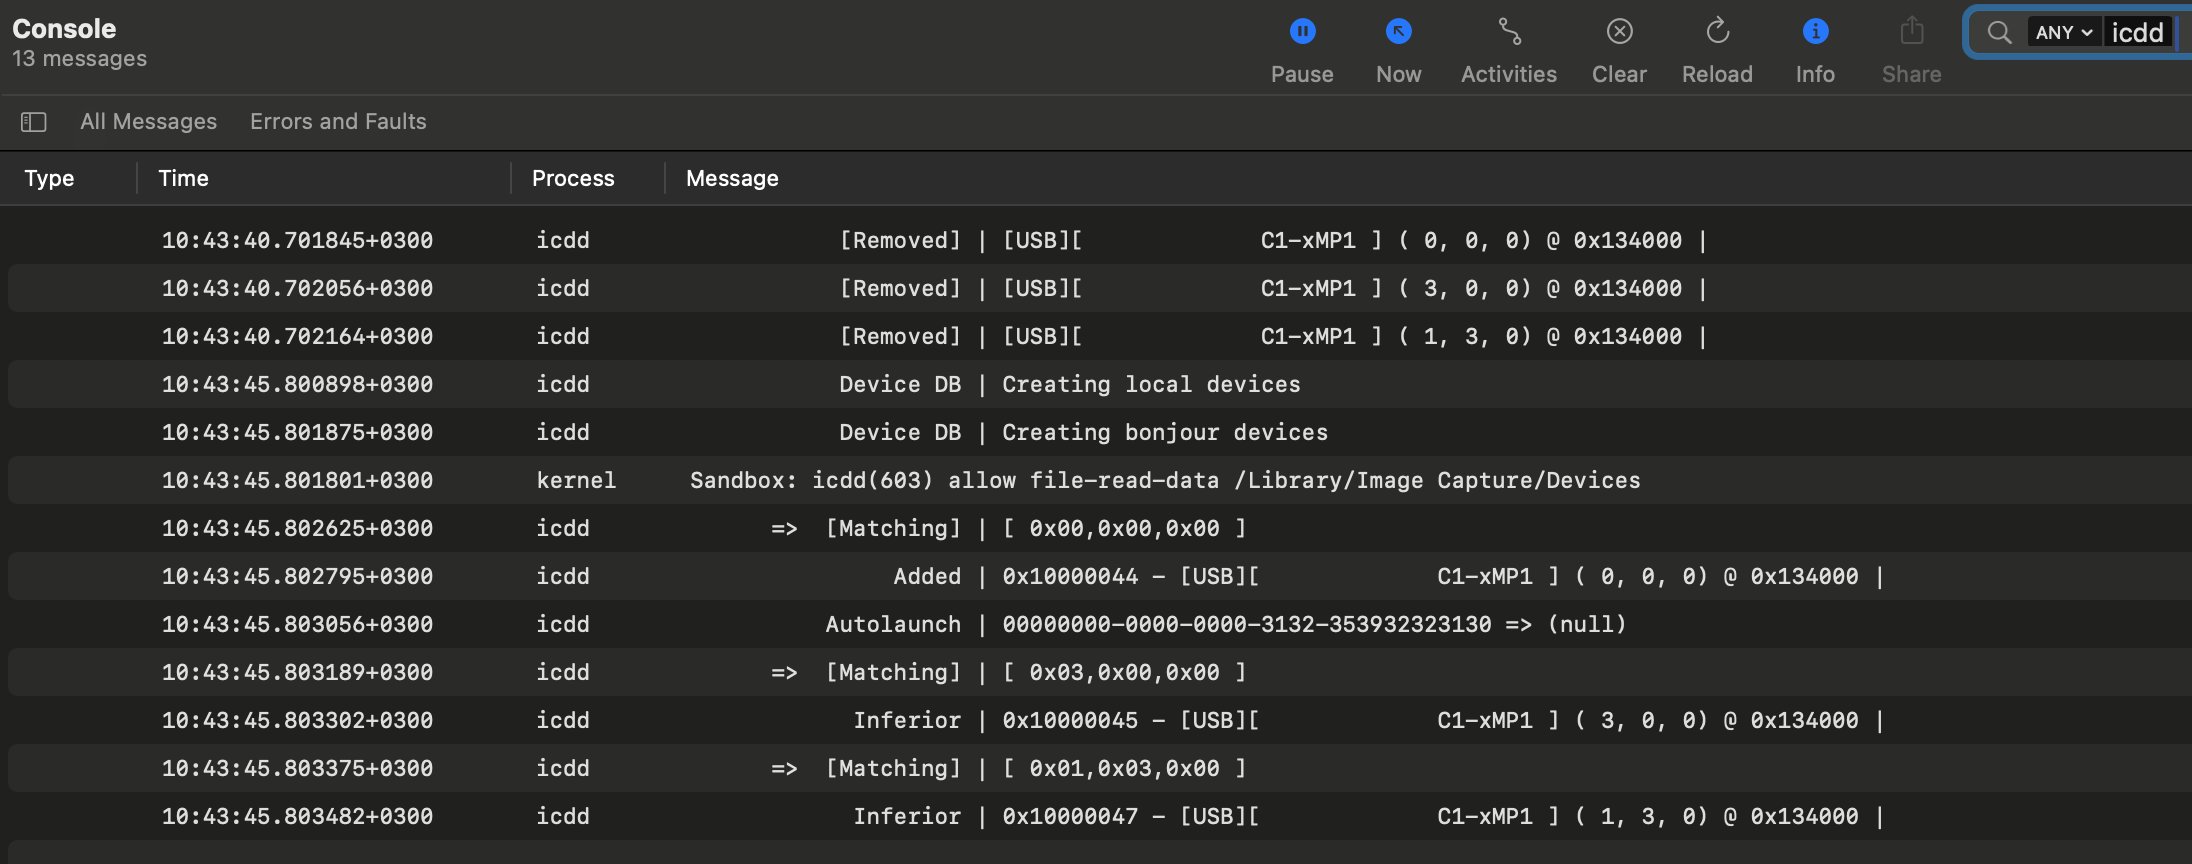
The Mac has a build-in Console that shows logs of when hardware connects to the computer.
Open the Console

Type in the search area: icdd, hit enter and then click on Start

Disconnect the C1-xMP1 cable from the Mac and then connect it again (always on a USB-A port). You should see the following data being populated on the Console.
If you don't see this data then click Pause, then on Clear and then on Errors and Faults
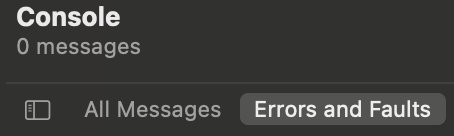
Disconnect the C1-xMP1 and click on Start. Then connect the C1-xMP1.
Check if there are any errors related to C1-xMP1 that appear on the Console.
If there are errors it means there is an issue with the connection. If you are connecting via USB-A and it is still producing errors, you can try using a USB Hub or USB-C docking station that has USB-A ports.
9. Mac - "Invalid mph.license" message
If you get a message on the left bottom corner of the MP Host that the license is invalid it means that the mph.license file was not generated for that computer.
You can use the License Manager application (recommended) to create a new license. Download it from the user portal.
The hardware.id file is a digital signature of your computer and your mp controller combined, so it is passed to our user portal to generate a license.
Alternatively, if you have copied the hardware.id and/or the mph.license file from another computer (perhaps using the Mac Time Machine) delete both the mph.license and hardware.id files and run the MP Host in the DAW to create a new hardware.id file.
Unload any instances of the MP Host and then load one MP Host in the DAW. It will create the hardware.id file automatically.
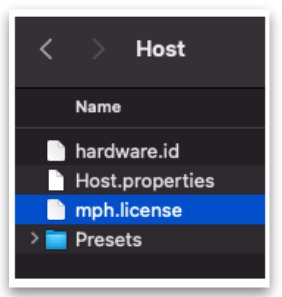
Then, log on your user portal account (see email when you purchased the MP Controller) and upload the hardware.id file to generate a new mph.license and download it. Then place it in the /MP/Host folder as shown below:
The hardware.id and mph.license files should have these 2 exact names.
10. Mac - C1-xMP1 not showing up in the System Report
If you have tried the steps in this article and it did not work, try the following troubleshooting steps.
The MIDI port of the MP Controller should be connected with a USB-A interface on the Mac and does not require any drivers to be installed as it is a USB MIDI class compliant device.
Optional: If you have Windows computer available connect the MIDI port of the MP Controller directly on a USB port and check the device manager for C1-xMP1 ![]()
If it does not show up in the Device Manager, proceed to the next step. If it shows up in the Device Manager, the problem could be with a connection method on the Mac and you can try the next step to eliminate any connectivity issues.
If you are connecting to a USB-A port directly to the Mac and C1-xMP1 still does not show up in the System Report, first check using another cable.
System Report > USB Tree
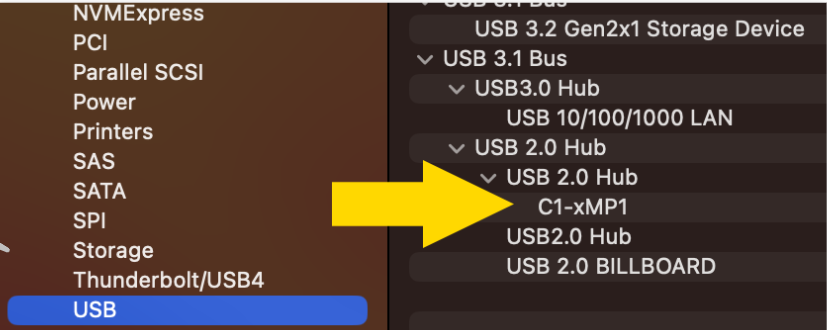
The Mac's System Report needs to be reopened to show newly connected devices. Alternatively you can open a terminal and paste this command
system_profiler SPUSBDataType | grep -i "C1-xMP1"
If it is connected it will print: C1-xMP1. If not, it will not print anything.
While on the terminal pressing the up arrow on the keyboard and enter will repeat the command
If you are certain the problem is not with the cable you need to check the internal micro-USB bridge port cable that connects on the MIDI board.
The MP controller is meant to be rack mountable so it has bridge ports from the enclosure to its modules. You can bypass these bridge ports.
-
To get to that port, you need to unscrew the bottom cover.
-
Open up the bottom cover by unscrewing the bottom screws.
-
Disconnect by pulling gently the microUSB cable and connect it again.
Do not bend the microUSB port on the board as it is sensitive and you run the risk of permanently damaging the board.
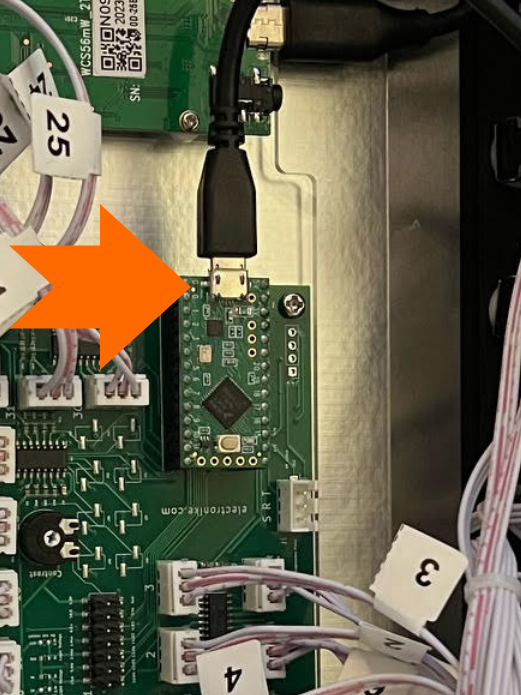
Close and reopen the System Report. If it is still not showing in the System Report try to bypass the internal microUSB to USB-C bridge port as described in the next step.
Bypassing the internal USB Port (Bridge port)
The problem may be with the bridge port.
The bridge port cable connects the MIDI board to the port mounted on the enclosure.
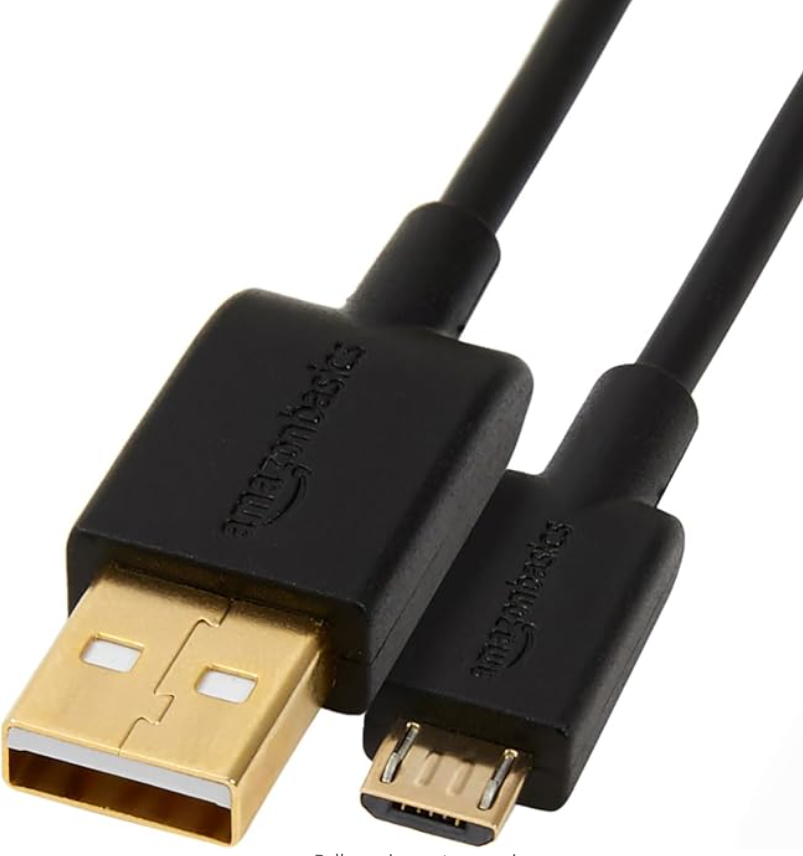
You can try to bypass the bridge internal port of the C1-xMP1 and connect it directly using a microUSB to USB-A DATA cable as shown below.
Please note that not all microUSB cables are data cables. Many are just charging cables and these will not work. Ensure you are using a data cable.
Amazon Basics cables are recommended.
If these steps do not solve the issue then the problem is with the MIDI board. Send us an email at support@mpmidi.com explaining in detail all the steps you have tried and we can advise further on how to proceed.
11. Apple could not verify the installer. How to open the installer.
MacOS Gatekeeper preventing the opening of the .pkg installer because it was downloaded from the internet.
This is a common issue on modern MacOS.
Open System Settings > Privacy & Security.
Scroll down to the section that says:
“MPH_MAC_INSTALLER-...pkg was blocked from use because it is not from an identified developer.”
Click “Allow Anyway.”
Then, right-click the .pkg file and select “Open.”
A new prompt will appear — this time with the option to “Open”. Click it.
Optionally set the following setting in Privacy and Security so that you don't get the same prompt the next time you update:
