Note that the MP Controller must be connected for the Control Surface app to work
--- ##### Installation and Control Surface configuration on MacOS: The first time, run the Reason Control Surface app from the Applications folder. MacOS will ask for your permission. See [this page](https://kb.mpmidi.com/books/mp-controller-documentation/page/3-reason-cs-mac-os-installation-permissions "Reason CS Mac OS Installation Permissions") on setting the permissions and then continue with the rest of this article. Run the Reason Control Surface launcher from your Desktop. Repeat the same for the permissions needed as above. [](https://kb.mpmidi.com/uploads/images/gallery/2025-10/Guu6nEhj8CVkkTB9-image.png) and it will start the control surface app and Reason.The launcher app is made for Reason 13 and requires Reason to be in the Applications folder. If it does not start the Control Surface app and Reason, it is probably an issue with the permissions required.
Open Reason > Preferences and add the control surface. Click on "Add Manually" and select the MP Controller and the available MIDI ports. [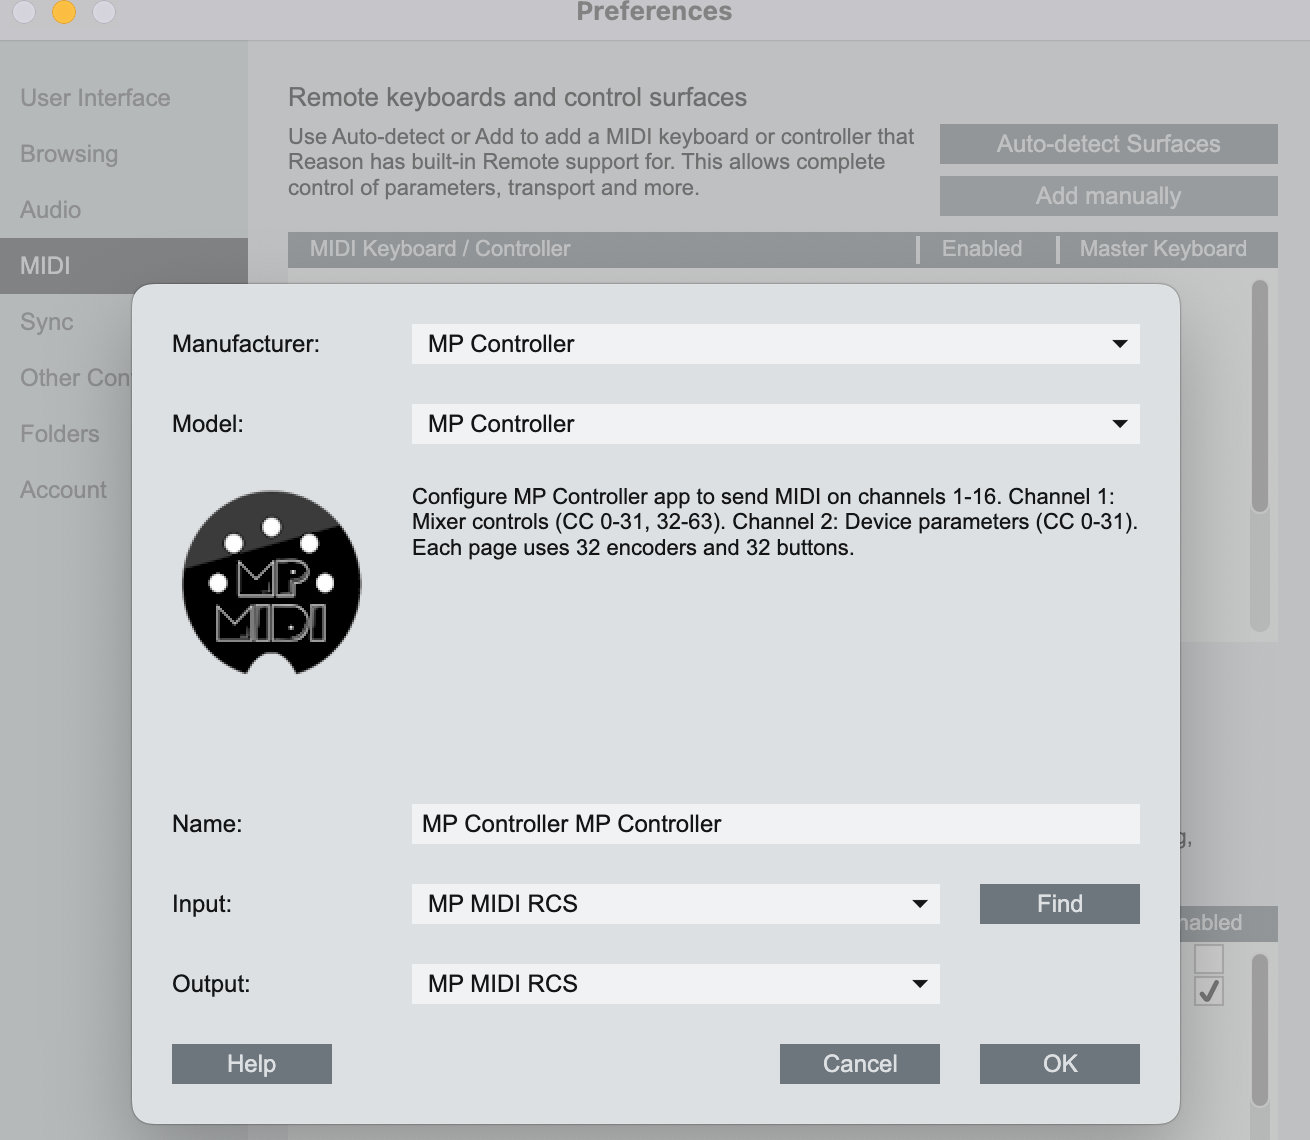](https://kb.mpmidi.com/uploads/images/gallery/2025-10/WsHPnFRemUJH8QXH-image.png) [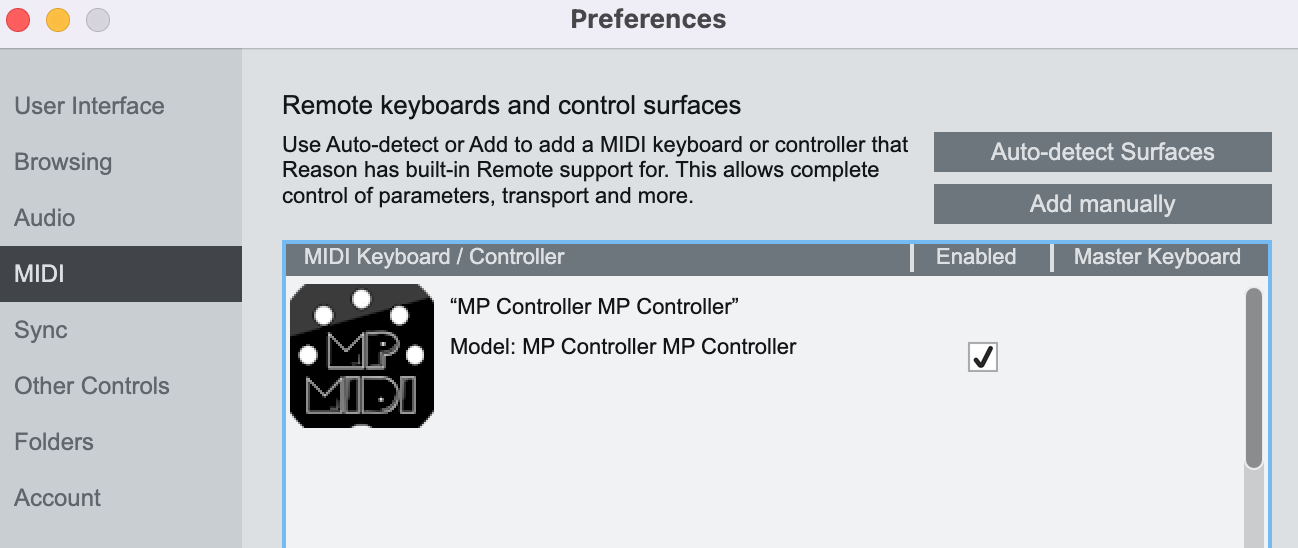](https://kb.mpmidi.com/uploads/images/gallery/2025-10/rzrPjEfwp8Fmg4LP-image.png) When you close Reason, the control surface app will quit as well after a couple of seconds. When running the Launcher it takes a few seconds for Reason to send all the necessary data to the control surface. You can then select any device or track to control it.On Mac the Reason Control Surface app must start before Reason so that it finds its MIDI ports.
--- ##### Installation and Control Surface configuration on Windows: To use the MP MIDI on Windows, you need to install a virtual midi port software. We recommend [loopMIDI ](https://www.tobias-erichsen.de/software/loopmidi.html)which is a free utility software. There are others as well like [LoopBe30](https://www.nerds.de/en/loopbe30.html). LoopMIDI allows you to create many virtual ports you need and set custom names for each port. For the Reason Control Surface we need two ports, one for sending MIDI CC and another one for receiving MIDI CC messages. After you install loopMIDI, open loopMIDI and add a port, name it "FROM REASON CS", then add another port and name it "TO REASON CS" [](https://kb.mpmidi.com/uploads/images/gallery/2025-10/8koaTvb0gkKh4TMJ-image.png) [](https://kb.mpmidi.com/uploads/images/gallery/2025-10/BqQhAmGELKf4UEon-image.png) so it will look like this: [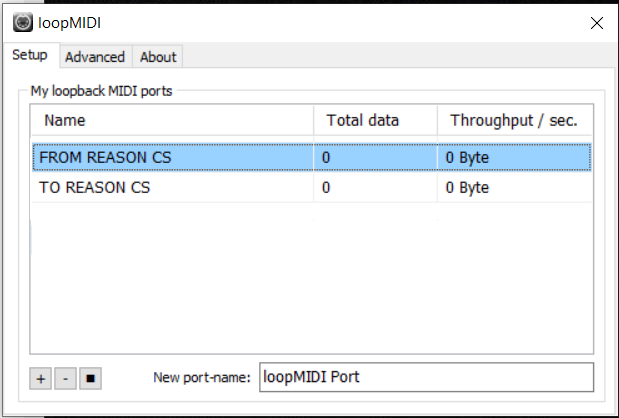](https://kb.mpmidi.com/uploads/images/gallery/2025-10/QGr1ZIUZ0V9227Vj-image.png) We have created a launcher app to start Reason and the MP Controller Reason Control Surface. Create a shortcut from C:\\Program Files\\Propellerhead\\Reason 13\\Reason.exe (or any version of Reason) to your Desktop named **Reason.app** [](https://kb.mpmidi.com/uploads/images/gallery/2025-10/VZXXhhFZjLK5Iw6U-image.png)The launcher uses this shortcut to launch Reason so when you update Reason to another future version, you just need to recreate the desktop shortcut.
Run the Reason Control Surface launcher from your Desktop and it will start the control surface app and Reason. [](https://kb.mpmidi.com/uploads/images/gallery/2025-10/KlU8d2WVTEWW7BJv-image.png) Open Reason > Edit > Preferences > MIDI and add the control surface. [](https://kb.mpmidi.com/uploads/images/gallery/2025-10/GE58maQyM7Am9YPt-image.png) Select the MP Controller from the list Select the available MIDI ports. Select **TO REASON CS** as the **input port** and **FROM REASON CS** as the **output port**. It should look like this and click OK. [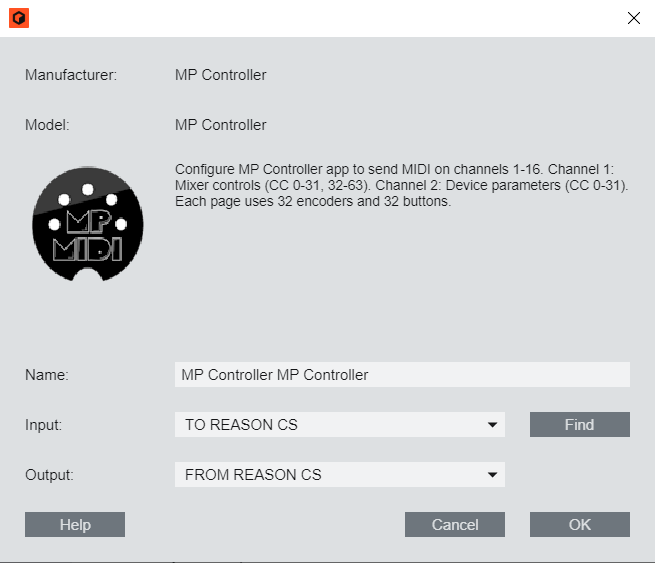](https://kb.mpmidi.com/uploads/images/gallery/2025-10/vszudMMasFenxysR-image.png)No other application should be using these virtual MIDI ports.
When you run the Launcher app to start the apps and then you close Reason, the control surface app will quit as well after a couple of seconds.
--- To view the version or quit of the Reason Control Surface right click on the bar icon [](https://kb.mpmidi.com/uploads/images/gallery/2025-10/whdwUtcLNmDYacLV-image.png) To quit click OK on the popup window: [](https://kb.mpmidi.com/uploads/images/gallery/2025-10/tktZ13iA9uX8zi3C-image.png) ---When running the Launcher it takes a few seconds for Reason to send all the necessary data to the control surface. You can then select any device or track to control it.
--- Next: [Documentation](https://kb.mpmidi.com/books/mp-controller-documentation/page/2-reason-control-surface-documentation) of the Reason Control Surface ---