You need to purchase and install MIDIGrade to control DaVinci Resolve.
##### How it works: The MP MIDI app will send MIDI messages to MIDIGrade. Upon turning a knob, MIDIGrade will translate the MIDI messages into mouse movements that correspond to DaVinci Resolve Parameters in the Color page. (It uses the mouse cursor to control parameters) MIDIGrade Website: [https://www.midigrade.com/](https://www.midigrade.com/) MIDIGrade Manual: [https://www.midigrade.com/MIDIGrade%20manual.pdf](https://www.midigrade.com/MIDIGrade%20manual.pdf) --- **Downloads and Dependencies:** Make sure you have everything that is listed below installed on your system before you proceed to the configuration. 1. Download & Install [MP MIDI APP](https://kb.mpmidi.com/books/mp-controller-documentation/page/1-the-mp-midi-controller-application) as explained in the article. 2. Download the zip file for [MIDI APP Preset, Preset Images & DaVinci Resolve Preset](https://drive.google.com/drive/folders/1KIe0UeAyvyu95FiUtHTZIVUC6rvAcsA_?usp=sharing) and unzip it. 3. Download & Install [loopMIDI](https://www.tobias-erichsen.de/software/loopmidi.html) **(Windows Only)** 4. Download & Install [MIDIGrade](https://www.midigrade.com/) 5. Download & Install [DaVinci Resolve](https://www.blackmagicdesign.com/products/davinciresolve) --- **Configuration:** After everything is installed, follow the next steps. **Step 1:** From the unziped file, drag and drop the "Color.xml" into the **[MP Host folder](https://kb.mpmidi.com/books/mp-controller-documentation/page/3-mp-host-properties-and-config-files):** (create the DavinciResolve folder) **Windows: ** C:\\Users\\%username%\\AppData\\Roaming\\MP\\Host\\MP MIDI Presets\\DavinciResolve Mac: /Users/USER/Library/Application Support/MP/Host/MP MIDI Presets/DavinciResolve or ~/Library/Application Support/MP/Host **Step 2:** **From the unzipped file, open the "images" folder and drag and drop all the images into: ** ~MP\\Host\\MP MIDI Presets\\Images **Step 3: *(Windows Only - Mac users go to step 4)*** Open loopMIDI and add a port, name it "PORT 1", then add another port and name it "PORT 2" 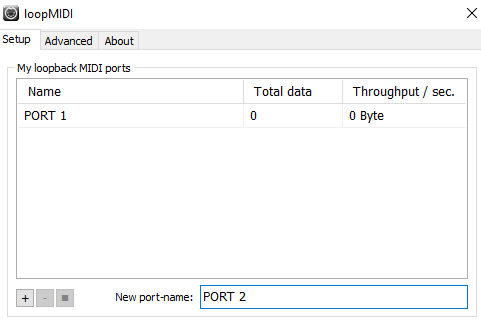 ### 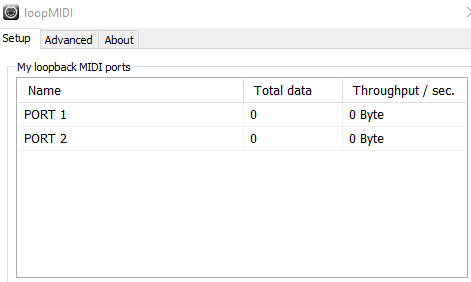 **Step 4:** For more detail configuration & Troubleshooting on MIDIGrade software, please advice the MIDIGrade Manual: [https://www.midigrade.com/MIDIGrade%20manual.pdf](https://www.midigrade.com/MIDIGrade%20manual.pdf) Open MIDIGrade and set up the settings according to your DaVinci Resolve configuration: 1. Set the MIDI input device 2. Select your screen resolution that DaVinci Resolve will be open 3. Select your DaVinci Resolve Version "19/18/17" 4. Select DaVinci Resolve "Studio" or "Free" 5. Select "Dual Screen" if you have enabled the Dual Screen Mode in DaVinci Resolve 6. Select between the three options according to how it is set up in yourDaVinci Resolve  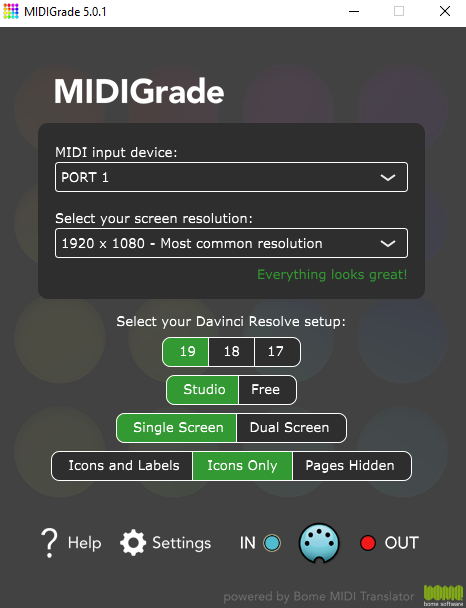 Mac Users use port "**MP MIDI"** **Step 5:** Open DaVinci Resolve & press "Ctrl + Alt + K" shortcut on your keyboard to open the Keyboard "Customization" window. Next click on the three dots top-right corner and click on "Import Preset": 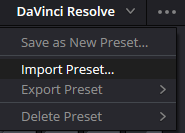 Then open the "DaVinci MP Controller.txt" file. **Step 6:** Restart the computer. **Step 7:** Now in order to use it, you just have to open, loopMIDI, the MP MIDI APP, open MIDIGrade, and load your DaVinci Resolve project you want to work on. Navigate to the Color page and you are ready to control what you want. --- ##### Dolby Vision: The Dolby Vision license for DaVinci Resolve is a software license that enables the use of Dolby Vision technology within DaVinci Resolve. Dolby Vision is an advanced HDR (High Dynamic Range) format developed by Dolby Laboratories, which provides improved color, contrast, and brightness, delivering high-quality visuals. The license allows you to create, edit, and export Dolby Vision HDR content, including the use of Dolby's proprietary tone mapping and metadata management, which ensures the best possible viewing experience across a range of devices. Even though the most important parameters of Dolby Vision can be controlled, the Dolby Vision license usually requires a separate activation and involves a licensing fee, which helps cover Dolby's proprietary technology costs. In some versions of DaVinci Resolve Studio, basic Dolby Vision tools might be included, but more advanced capabilities require the full license. ##### Dolby Vision useful links: 1. [https://professional.dolby.com/licensing/](https://professional.dolby.com/licensing/) 2. [https://professional.dolby.com/content-creation/dolby-vision-for-content-creators/](https://professional.dolby.com/content-creation/dolby-vision-for-content-creators/) 3. [https://prostore.dolby.com/products/dolby-vision-individual-certification](https://prostore.dolby.com/products/dolby-vision-individual-certification) --- ##### Troubleshooting: **1.** For Windows users, make sure all of your monitors are connected on the same graphics card. If the monitors are connected on 2 different graphics cards it will not work. **2.** The CC 42 Channel 3 & 4 doesn't turn the 1st Saturation as written in MIDIGraded Manual. Instead it turns the 2nd Saturation. (This will be fixed in a future update of MIDIGrade as Julious from MIDIGrade informed us.) **3.** Dolby Vision parameters in DaVinci Resolve cannot be controlled without a Dolby Vision license.(Touto pistefko kserun to oi users tou davinci pou en pro kai en na xrisimopiisoun dolby vision.)