# 8. Display does not power On (Mac or Windows)

<div dir="ltr" id="bkmrk-model-1a%2B%2F2a%3A-when-y"><span dir="ltr">**Model 1A+/2A**</span><span dir="ltr">: When you connect the display USB-C port to power, **it should show the MP MIDI logo** </span></div><div dir="ltr" id="bkmrk-%28as-shown-below%29%C2%A0at-">(as shown below) at boot.</div><div dir="ltr" id="bkmrk-"></div><div dir="ltr" id="bkmrk-the-display-will-go-">The display will go to sleep in a couple of seconds if there is no video signal, <span dir="ltr">or the video signal received is not 1920 x 1080 resolution at 60Hz refresh rate.</span> </div><div dir="ltr" id="bkmrk--1"></div><p class="callout info">As shown in this [video](https://youtu.be/q9NsGBj-H7s)</p>

![](https://kb.mpmidi.com/storage/uploads/images/gallery/2025-04/1745653906-4q6qvgqtULLPhLaJ.jpeg)

<p class="callout info">**Model 1A:** when connected to power only, after 2 seconds it shows <span dir="ltr">on the display</span> the message "No Signal" and then after 2 seconds the message "Power Saving" and it automatically powers off, if there is no video signal or the video signal received is not 1920 x 1080 resolution at 60Hz refresh rate.   
If you don't see the "No Signal" message and you are uncertain whether your computer's USB port can provide enough power, connect a wall adapter 5V/2A (or more amps) - like a typical phone charger - and it should show the message "No Signal". This shows that the display receives enough power. Connect the HDMI and when it receives video signal.  
  
If the display is connected to a wall adapter and you are certain it provides 5V/2A, but the display is still not showing anything, you may have an issue with the controller display or a damaged bridge port. [Contact us](https://mpmidi.com/contactus) for servicing instructions.  
  
If the display shows video but restarts frequently (flickers), it means you need to provide more power, see the guide [here](https://kb.mpmidi.com/books/mp-controller-documentation/page/1-model-1a1a-using-a-y-cable-to-provide-more-power-to-the-display)  
  
</p>

---

##### Providing Power to the display (Model 2A)

Power can be provided by either USB-C ports of the display. (but **not** the far right USB-C MIDI port)

![](https://kb.mpmidi.com/storage/uploads/images/gallery/2025-04/1745653907-DdGQ4Ww8GZTV5iuZ.jpg)

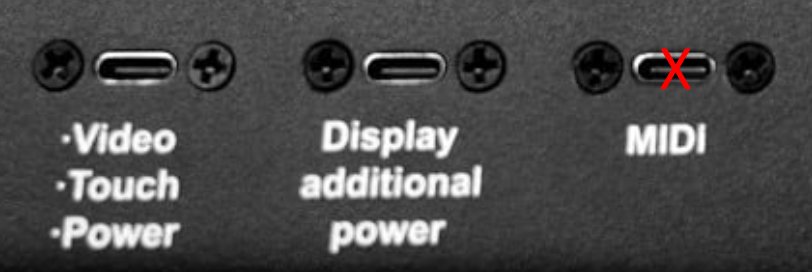
It does **not** need to be connected to a computer to show the logo when it receives power.

It can be connected on a computer or a wall adapter (5V/2A) or power bank on any of the 2 USB-C ports.

<p class="callout info">If you only connect to a computer the "Display additional power" port only and HDMI, (but **not** the Video/Touch/Power port) then the there will be no touch screen functionality.</p>

See video [**<u>here</u>** ](https://www.youtube.com/watch?v=TCrdMa9_66Q)for connection options.

<p class="callout info">Power can be provided via external wall adapter (5V/2A), or USB-C to USB-C   
(thunderbolt on a computer that has thunderbolt USB-C) or USB-C to USB-A</p>

---

##### <span dir="ltr">Black Screen, nothing is shown when connected to power</span>

<div id="bkmrk-if-you-don%27t-see-any">If you don't see anything on the display and it is entirely a black screen here are the possible causes of the problem:</div><div id="bkmrk--7">  
</div><div id="bkmrk-1.-you-have-turned-i">**1. You have turned it off from the remote control (model 1A+/2A).** </div><div id="bkmrk-after-connecting-the">After connecting the power USB-C cable, point the remote control to the IR receiver of the unit and press he power button on the remote control.</div><table id="bkmrk--8"><tbody><tr><td dir="ltr">![](https://kb.mpmidi.com/storage/uploads/images/gallery/2025-04/1745653907-W9nkj9IOXYQoohLV.jpg)</td><td>![](https://kb.mpmidi.com/storage/uploads/images/gallery/2025-04/1745653908-zwUVGwVRCVg05IoF.jpg)</td></tr></tbody></table>

<p class="callout info">
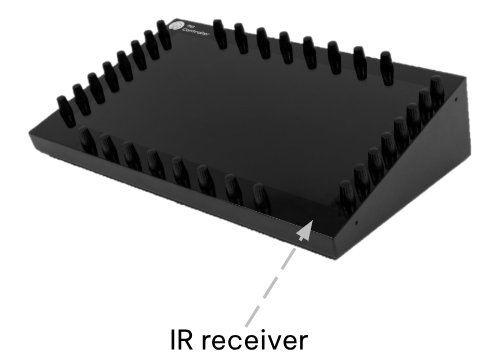
Here is how to check that the remote control is working properly and does not need a new battery.   
The remote control light is infrared and can't be seen.   
Go into a relatively dark room and open your mobile/cell phone camera.   
Point the remote to the camera, and press a button on the remote control.  
You would see a light blinking in the camera.  
See instructional video [here](https://drive.google.com/file/d/1VAJktDCLZiq-y-Zf6PxZPnfpTir_w-BE/view?usp=sharing)</p>

<div id="bkmrk-2.-the-display-is-no">**2. The display is not receiving enough power.**</div><div id="bkmrk-this-sometimes-may-b">This sometimes may be caused by using long cables, for example, more than 1m long. Use a shorter, high quality DATA cable to power the display. [**<u dir="ltr">Here</u>**](https://kb.mpmidi.com/books/mp-controller-documentation/page/6-cable-recommendations) are some cable suggestions.</div><div id="bkmrk-3.-broken-bridge-por">**3. Broken bridge port on the enclosure.**</div><div id="bkmrk-model-1a%2B%2F2a%3A%C2%A0you-ca">**Model 1A+/2A: You can bypass the bridge port mounted on the enclosure of the unit, by connecting a USB-C cable to the LCD board directly. To reach the LCD board you need to unscrew the bottom cover.</div><p class="callout info"><span dir="ltr">**Model 1A:** You can bypass the bridge port mounted on the enclosure of the unit, the unit must be disassembled as the LCD board is mounted inside the display. [Contact us](https://mpmidi.com/contactus) for servicing instructions.</span></p>

<div id="bkmrk--12">  
</div><div id="bkmrk-4.-disconnected-cabl">**4. Disconnected cables inside the unit, on the LCD board.** </div><div id="bkmrk-unscrew-the-bottom-c">Unscrew the bottom cover. Then unscrew the LCD board and check that all the cables are properly connected.</div><div id="bkmrk--13">  
</div><div id="bkmrk-5.-model-1a%2B%2F2a%3A%C2%A0bro">**5. Model 1A+/2A: Broken LCD board.** </div><div id="bkmrk-the-lcd-board-has-le">The LCD board has LEDs that should light up when connected to power. Unless it has been powered off by the remote control. It should be either be powered ON using the remote control or the buttons on the IR receiver board (inside the unit)</div><div id="bkmrk--14">  
</div><div dir="ltr" id="bkmrk-6.-broken-display.%C2%A0">**6. Broken display.** </div><div dir="ltr" id="bkmrk-after-testing-everyt">After testing everything above, in this case the display needs to be replaced.</div>