13. Reason Control Surface
Documentation for the Reason Control Surface
- 1. Reason Control Surface Installation
- 2. Reason Control Surface Documentation
- 3. Reason CS - Mac OS Installation Permissions
1. Reason Control Surface Installation
We have created a control surface to control Reason's native devices, extension devices and plugins.
Download the installer from the user portal and run the installer on MacOS or Windows and it will install the following:
- The Reason Control Surface app. Mac: Applications folder and Windows: Program Files/MP Reason Control Surface
- The Reason Control Surface launcher on your Desktop
- The presets for Reason native devices in the /MP/Host/MP Reason CS Presets
- The Reason Control Surface scripts and remotemap file in
Mac OSX:
~/Library/Application Support/Propellerhead Software/Remote/Codecs/Lua Codecs
Windows:
C:\Documents and Settings\All Users\Application Data\Propellerhead Software\Remote\Codecs\Lua
Codecs
Mac OSX:
~/Library/Application Support/Propellerhead Software/Remote/Maps
Windows:
C:\Documents and Settings\All Users\Application Data\Propellerhead Software\Remote\Maps
Note that the MP Controller must be connected for the Control Surface app to work
Installation and Control Surface configuration on MacOS:
The first time, run the Reason Control Surface app from the Applications folder.
MacOS will ask for your permission. See this page on setting the permissions and then continue with the rest of this article.
Run the Reason Control Surface launcher from your Desktop.
Repeat the same for the permissions needed as above.
![]()
and it will start the control surface app and Reason.
The launcher app is made for Reason 13 and requires Reason to be in the Applications folder. If it does not start the Control Surface app and Reason, it is probably an issue with the permissions required.
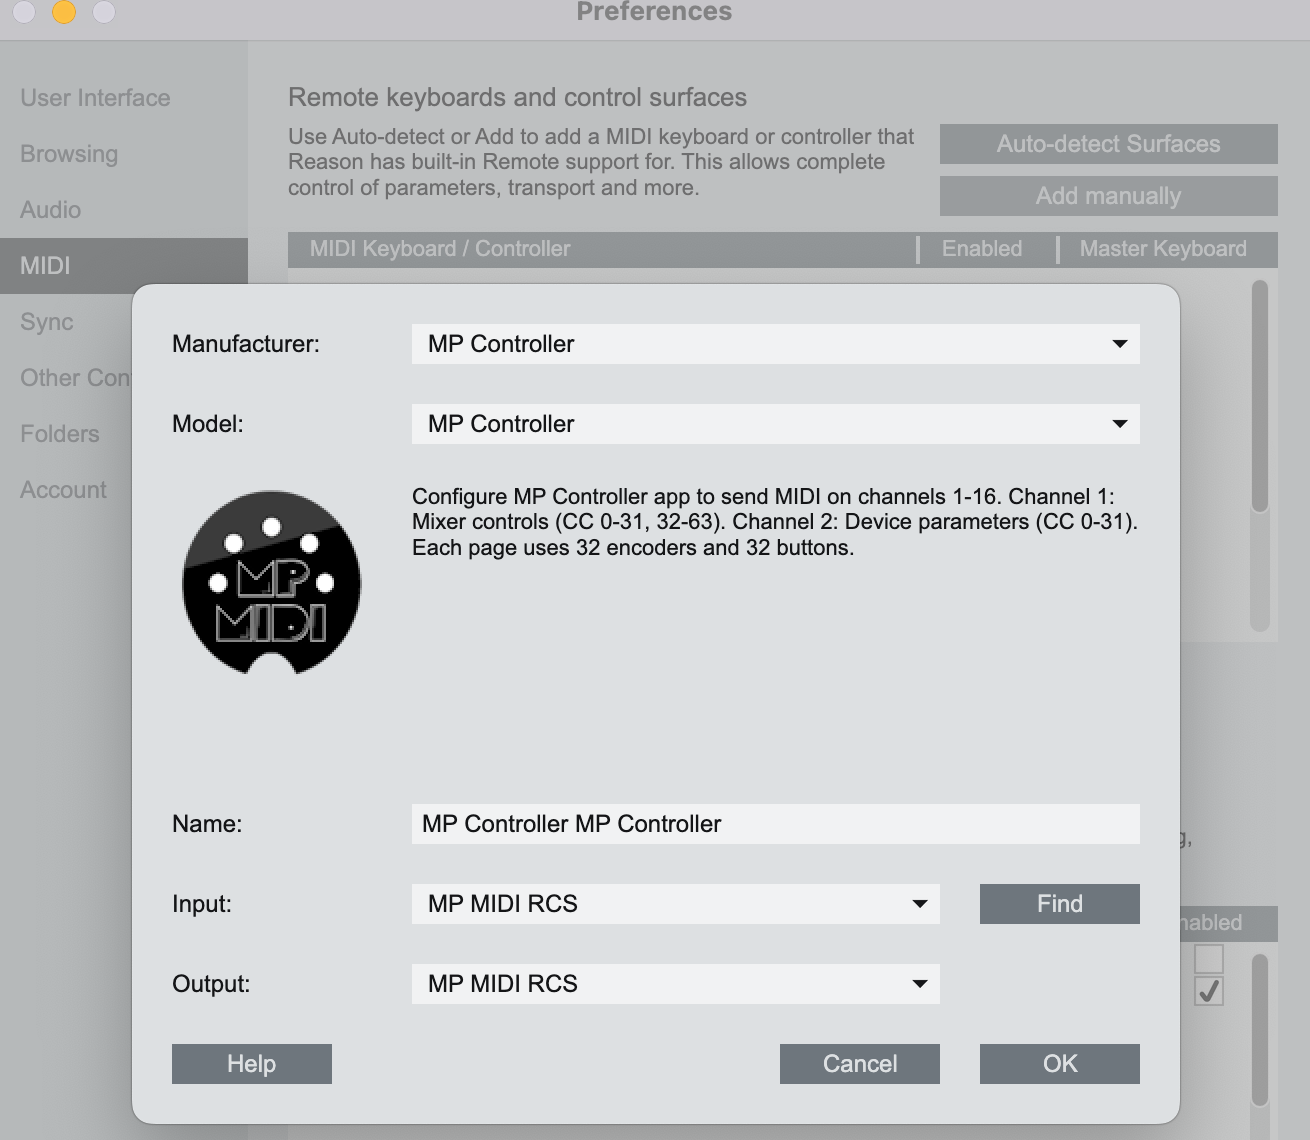
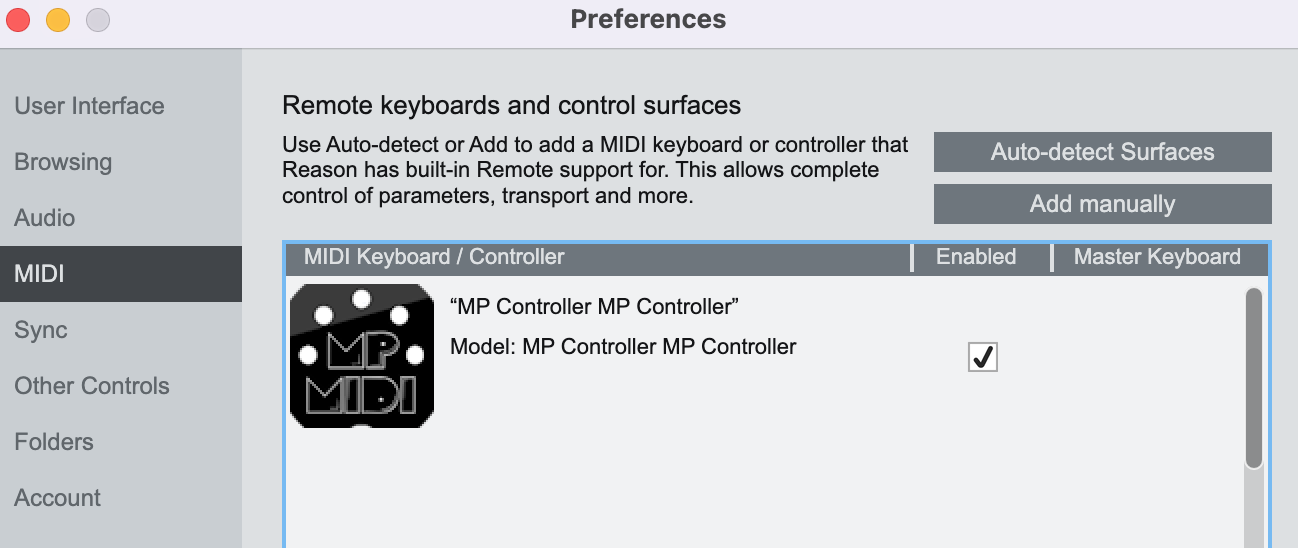
Open Reason > Preferences and add the control surface. Click on "Add Manually" and select the MP Controller and the available MIDI ports.
When you close Reason, the control surface app will quit as well after a couple of seconds. When running the Launcher it takes a few seconds for Reason to send all the necessary data to the control surface. You can then select any device or track to control it.
On Mac the Reason Control Surface app must start before Reason so that it finds its MIDI ports.
Installation and Control Surface configuration on Windows:
To use the MP MIDI on Windows, you need to install a virtual midi port software.
We recommend loopMIDI which is a free utility software. There are others as well like LoopBe30.
LoopMIDI allows you to create many virtual ports you need and set custom names for each port.
For the Reason Control Surface we need two ports, one for sending MIDI CC and another one for receiving MIDI CC messages.
After you install loopMIDI, open loopMIDI and add a port, name it "FROM REASON CS",
then add another port and name it "TO REASON CS"
![]()
![]()
so it will look like this:

We have created a launcher app to start Reason and the MP Controller Reason Control Surface. Create a shortcut from C:\Program Files\Propellerhead\Reason 13\Reason.exe (or any version of Reason) to your Desktop named Reason.app

The launcher uses this shortcut to launch Reason so when you update Reason to another future version, you just need to recreate the desktop shortcut.
Run the Reason Control Surface launcher from your Desktop and it will start the control surface app and Reason.

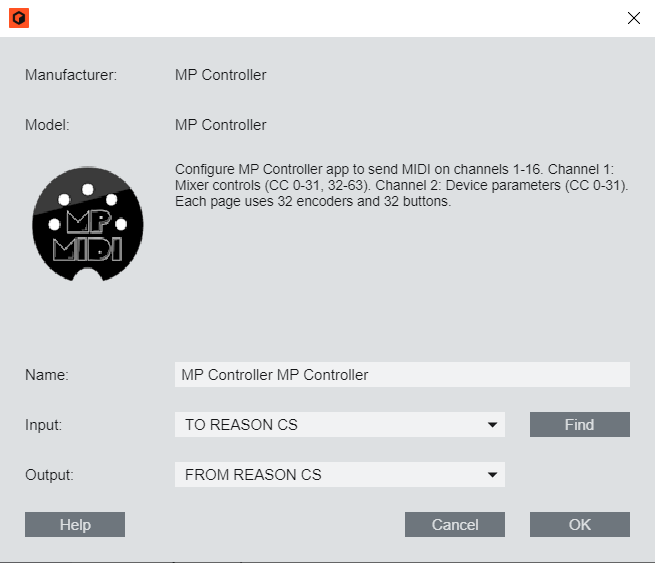
Open Reason > Edit > Preferences > MIDI and add the control surface.

Select the MP Controller from the list
Select the available MIDI ports.
Select TO REASON CS as the input port and
FROM REASON CS as the output port.
It should look like this and click OK.
No other application should be using these virtual MIDI ports.
When you run the Launcher app to start the apps and then you close Reason,
the control surface app will quit as well after a couple of seconds.
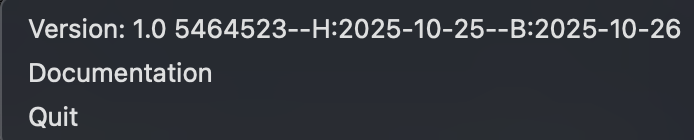
To view the version or quit of the Reason Control Surface right click on the bar icon
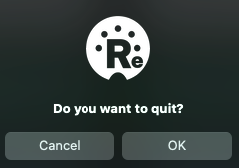
To quit click OK on the popup window:
When running the Launcher it takes a few seconds for Reason to send all the necessary data to the control surface. You can then select any device or track to control it.
Next: Documentation of the Reason Control Surface
2. Reason Control Surface Documentation
How it works
Reason uses a lua script and a remotemap file for communicating with control surfaces. The lua script defines the logic of communication and the remotemap file defines the available parameters mapped onto available control surface controls.
We have created presets for each device in Reason, including the Mixer Channel and Master Section.
To control a device select it by clicking on the side arrow ![]() in the Rack view (including the Master Section).
in the Rack view (including the Master Section).

Reason sends a message to the mp controller that the device is selected and it loads the corresponding device preset along with the values of parameters. The control is synced with the parameters of the device and you can control the device.
The only way to select a device is using the mouse from within Reason.
This architecture allows controlling only one device at a time. This means you cannot control parameters of other devices while you have selected a device. Reason is made that way so that only one device at a time can be controlled.
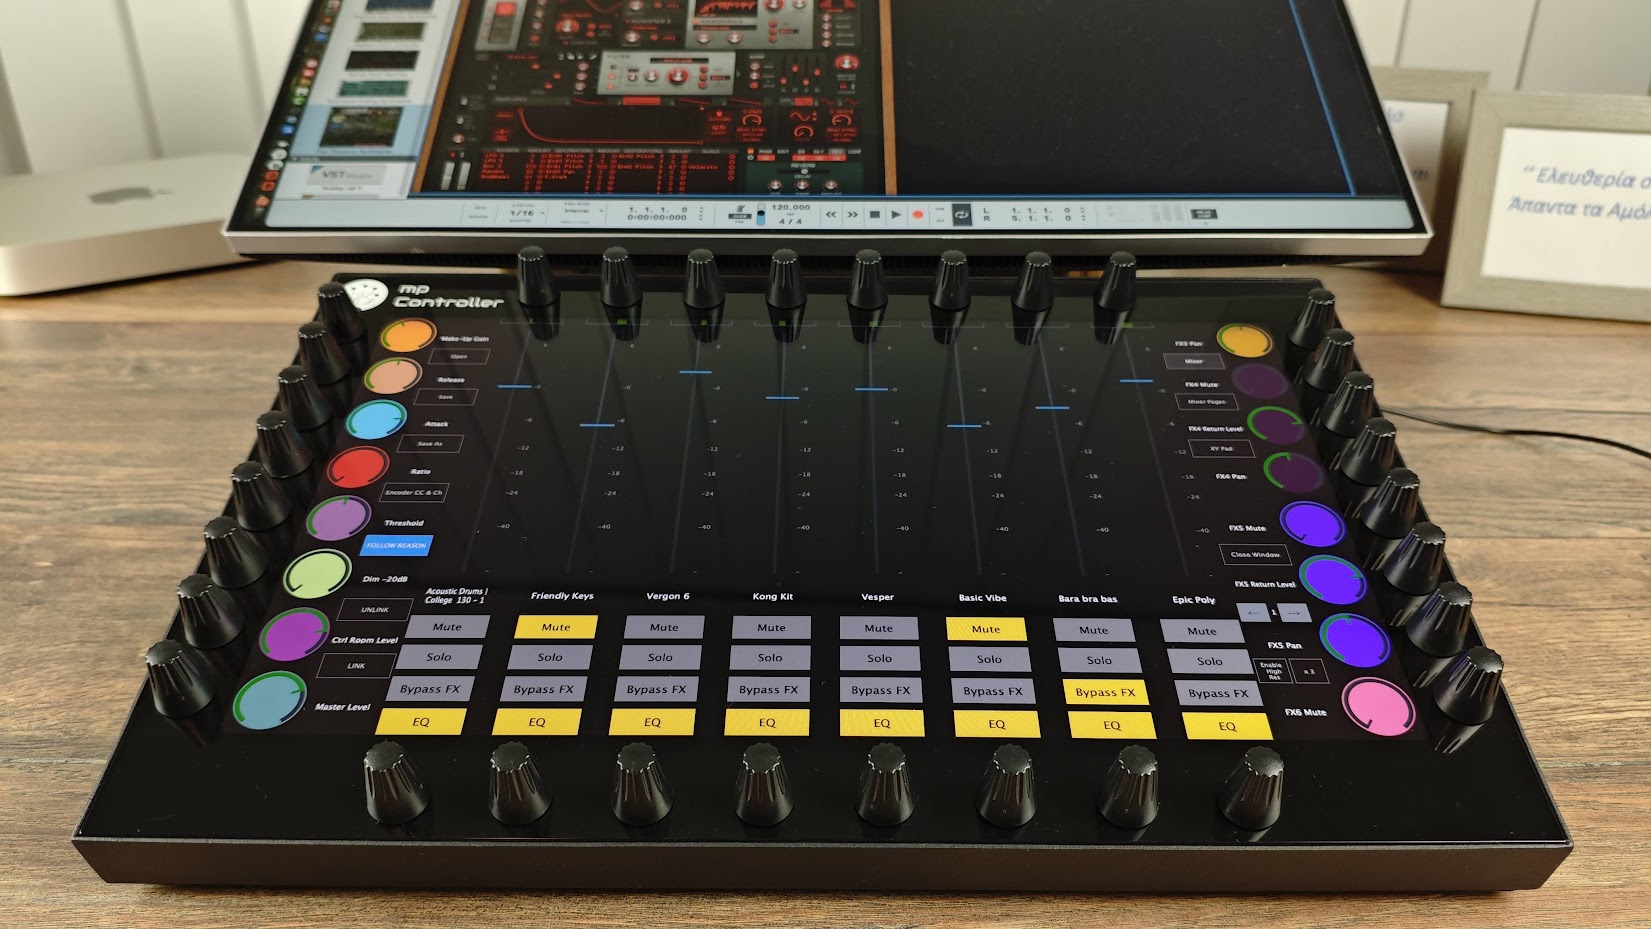
The control surface consists of 64 pages, each carrying 32 encoders, that is 2048 CC available for 16 MIDI channels. Each page has 32 encoders and each encoder has a CC id assigned to it starting from Channel 1 CC0 up to Channel 16 CC127.
The mp controller device presets have been mapped to the parameters of the Reason device.
Each page has a different set of parameters and you can switch to different pages via the on screen page buttons.
Highlighted pages with a green border color are pages that carry mapped parameters.
If the page is not highlighted, shows that it does not carry mapped parameters, with the exception of the Reason Master Section that has mapped parameters up to page 16, but from 7 and onwards are not highlighted because these are parameters mapped onto the Mixer buttons.
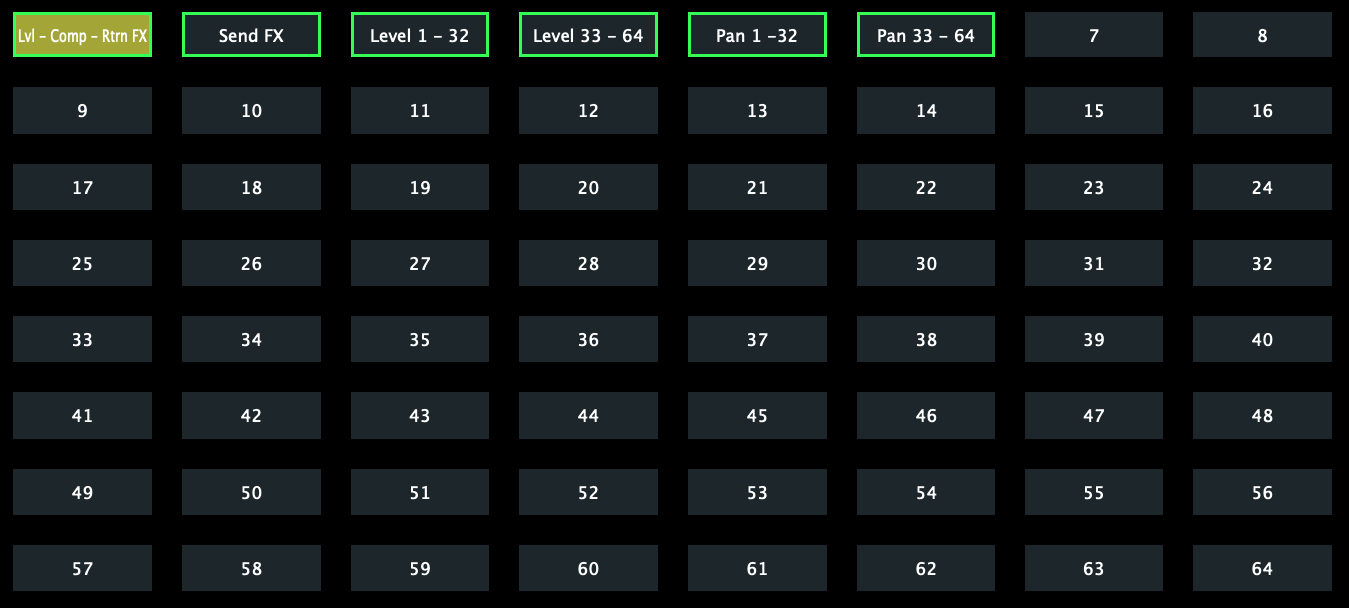
Double right click on a page button to rename it. Saving a preset will save the button name.
To control a Reason channel track you need to select an audio track from the rack view or Mixer view.
It loads a preset Reason Main Channel and it controls that selected channel.
The first time when opening the Reason project it will land on the last page of the preset that has mapped parameters as it receives all the parameters from Reason. Thereafter, it will always open on the last selected page. For example, if you are on Subractor page 3 and you select MClass Compressor and then go back to Subractor, it will land on page 3 because that was the last Subtractor page open.
Device ID name - Device name - Device Patch name
The controller displayed the Device ID name on the left and the Device name on the right. Some devices get the Preset name from the loaded patch. If the Device name name is the same as the Patch name, then it will only display it once.
![]()
Follow Reason
![]()
Preset buttons:

The top row of buttons has the ability to open a preset. This is useful when you have created other presets for the selected device. The Reason Control Surface App will always open by default the preset that matches the device name. If you have created other presets you can open them using these buttons. There are 8 buttons and each can open a different preset.
Right click on a button, click the box “Active” and this will set the button color to yellow. Select the preset you want to be opened when clicking the button. Click Close to close the menu. Save the current preset. You need to repeat the process for each preset to program it for opening other presets. If you have for example 3 presets for a device, you need to set the buttons on each preset.
![]()
Creating Presets for devices
To create another preset for a device, unlink the parameters using the unlink button or use the “Clear Page mappings” from the right click menu.
You can then link parameters by enabling the Link mode and moving parameters with the mouse.
The Ink mode will continue to link the next encoder when you move another parameter with the mouse. Clicking on any encoder on the page will continue linking from that encoder. Click the Link button again to exit the Link mode.
The linked encoder will inherit the name and color as it was linked in the default preset. You can change the color of an encoder by right clicking on it and the color selector will appear. You can change the name of an encoder by double clicking the name label area of an encoder. Note that each parameter can only be linked to one encoder per preset.
If you create another preset for the Reason Master Section, place it in another subfolder and name it Reason Master Section. If you name it differently it will not work correctly. The name must always be Reason Master Section for any preset controlling the Master Section.
Mixer Mode
This view is only available for the Reason Master Section, the Mixer 14:2 and the Line Mixer 6:2.
The mixer view will control the volume level using the button encoders and the pan using the top encoders. Additionally, the on-screen faders control the volume level.
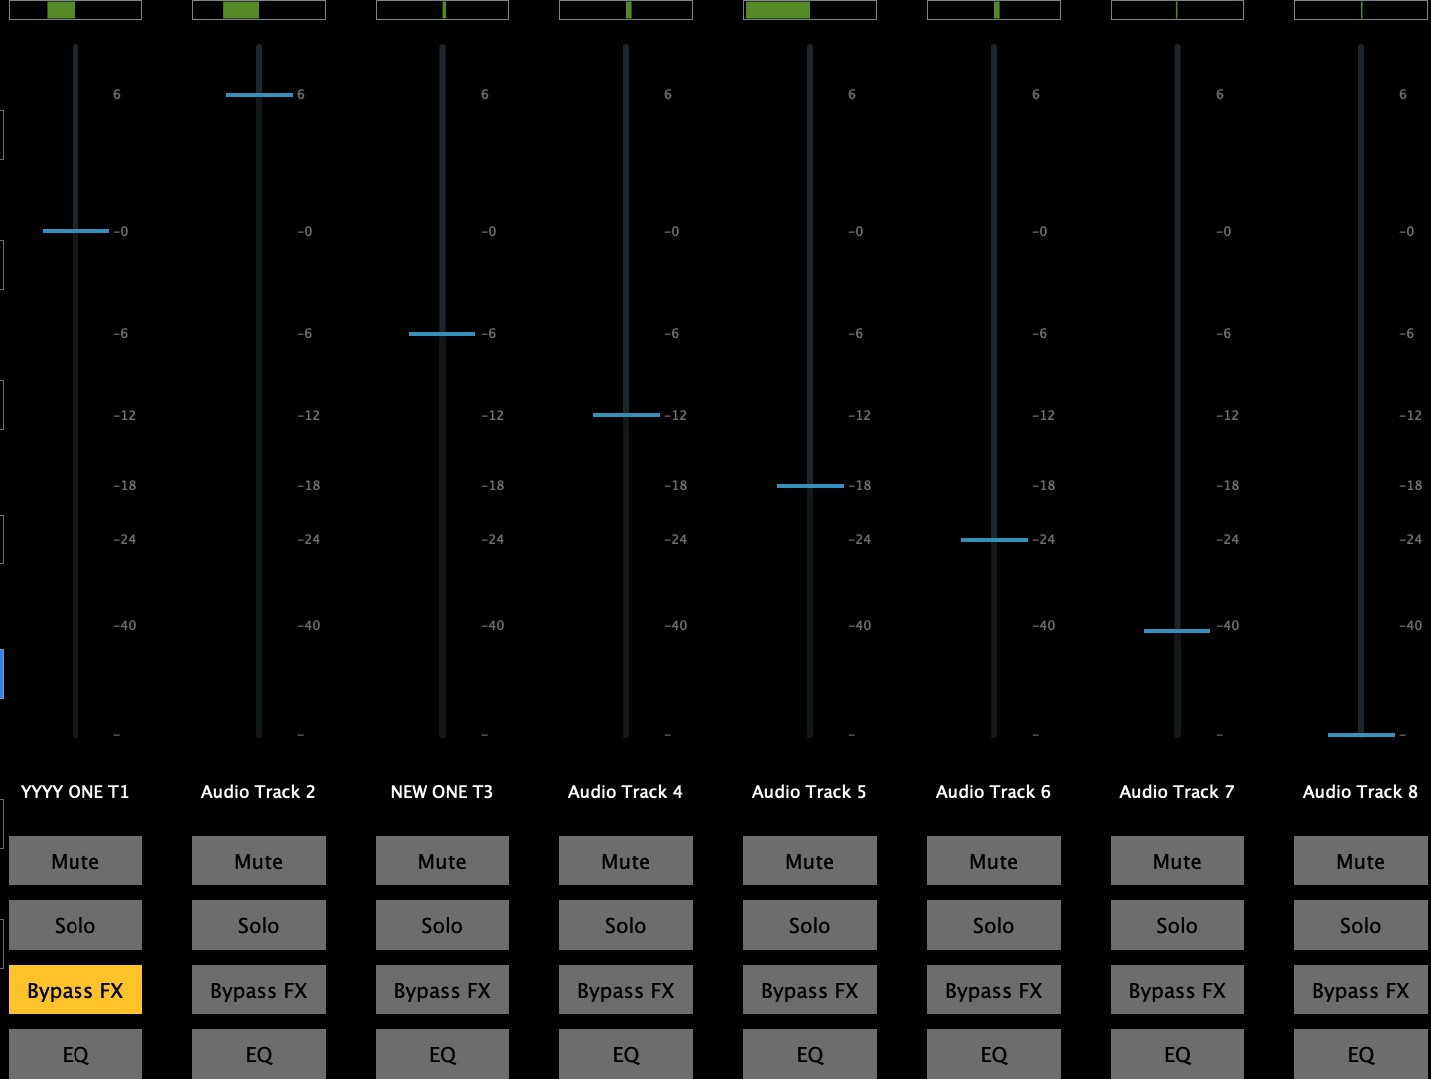
In the Reason Master Section, there is another button named Mixer Pages and it allows you to navigate to the 8 different Mixer pages. Each page can control 8 channels and Reason can control a maximum of 64 channels per Remote Base. The Remote Base can be set by clicking at the button of the channel in the Mixer view of Reason.

When you enable the mixer mode, the buttons for Next and Previous page become highlighed and they now control the mixer page navigation instead of the preset page navigation:
![]()
If you have a project with 128 tracks and the Remote Base is set to the first track, the control surface will control tracks 1 to 64. If you set the Remote Base to track 64, it will control tracks 64 to 128. Right click on a track and select the Remote Base. Doing so, will resend the track names to the control surface.

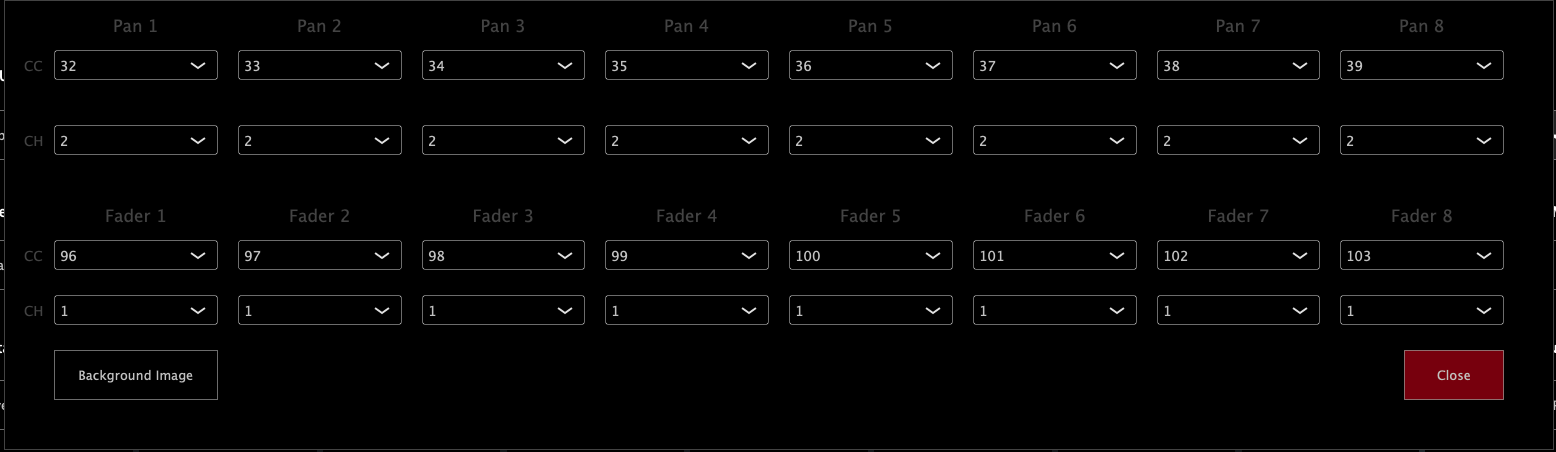
Set encoder IDs on the Mixer
Right click on the Faders and the top menu will open that allows to select other CCs and Channels. This is not essential and should only be used if you want to use the mixer components.
Locking the Control Surface to a device
When you right click on a device or the Reason Master Section (on the Mixer main channel area) you will see the option:
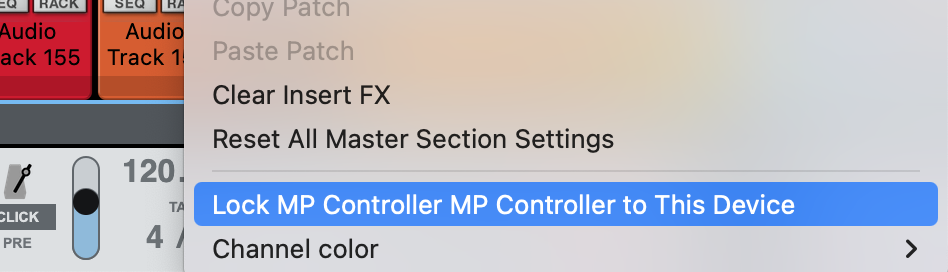
If select to Lock the CS to a device it will not be available to use on other devices even if you click on the side arrow.
Note that some small Reason devices that are half rack size like the DDL-1 Digital Delay Line require to lock the CS on them as they don't have the option to select them.
How to add a new device in the control surface via the Preset Tool
This tool is experimental and has been created as an internal tool to help controlling other devices. Use with cauiton.
Download the tool for Mac and Windows from here
Extract the zip file of the Preset Tool in a folder anywhere you like on your computer.
Reason provides the available list of parameters of a device via an export function from the File menu.
Select a device and then export the Remote Info file for that device.
Place the file in the extracted zip folder of the Preset Tool and run it once.
All files (Preset tool files, default.xml and the Remote Info.txt file) should be in the same folder.
Use only one Remote Info.txt file every time. if you have other Remote files delete them.
Windows file to run: ReasonPresetPipeline.bat
Mac file to run: Reason Preset Pipeline.command
Check the logs on the screen to see if everything worked properly.
The tool will create a backup of the lua script and the remotemap file every time you run it.
It will then add the device in the list of devices in the lua script and add at the end of the remote map file the mappings.
Last, it will create a preset for the device and place it in the Presets folder of the Reason Control Surface.
Disable and enable the Control Surface from the Reason’s Preferences and give it a few seconds to sync up.
Select the device you have mapped and it will load the mp controller preset and sync up with the values.
The lua script and remotemap files can be edited in text editors like Sublime and you can troubleshoot adding new devices by opening these files and comparing the additions made to the files with the original backup files.
To restore the backup files, delete the new lua and remotemap files and rename the backup files by removing the .backup extension from the file name.
Please note that adding too many devices with a large number of parameters to the lua and remotemap files will affect Reason’s performance and start time. This is how Reason works with all control surfaces. There is also a limit to 127 devices. We have added 62 Reason devices.
3. Reason CS - Mac OS Installation Permissions
When opening the installer you will be prompted to allow it from the System Settings
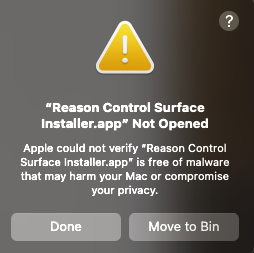
click Done and go to System Settings > Privacy and Security and scroll down

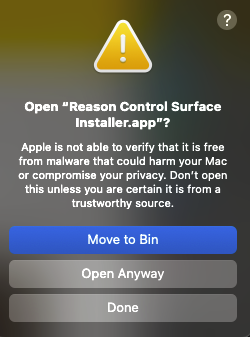
Click Open Anyway
Click Open Anyway
Enter your password
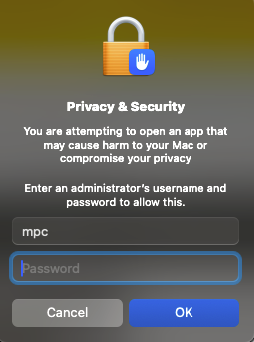
and you will be prompted to enter your password again so that the installer has the necessary permissions to install the files.
Click on Quit
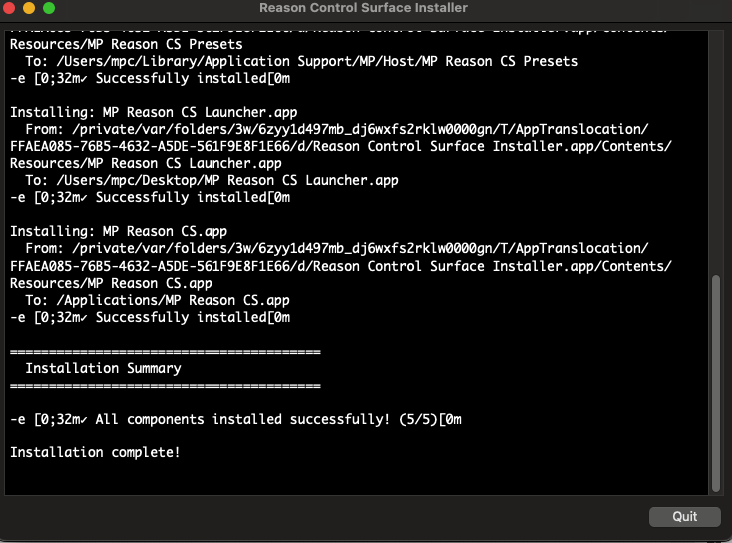
Go to Applications folder and run the Reason CS.app

It may ask for permissions, if it does not then close it and go to the desktop
Close Reason if it is running. Click on the

It will start the control surface app and Reason.
When you quit Reason, it will automatically quite the control surface app, after a couple of seconds.
Set the permissions on the Remote scripts folder:
open a Terminal and copy/paste the following. It will ask for your password, enter it and hit enter. It should not produce any output.
sudo chmod -R 777 ~/Library/Application\ Support/Propellerhead\ Software/Remote/
Continue with the installation guide.