19. MP Gain Utility - Version 2
The MP Gain Utility plugin enables you to control the +/- gain on your tracks from the MP Controller. With the MPGU plugin you can control up to 128 gain parameters.

Download
The MPGU can be downloaded from the user portal.
How it works
The MP Gain Utility consists of two plugins. One server plugin and one client plugin. Both are lightweight plugins and consume negligible amounts of cpu and ram resources.
The MP Gain Utility can be found in your DAW as MPUT.
You only need to load one instance of the server plugin per DAW project. YouThe plugin can be placed on any track in your DAW however there must be only one instance loaded.
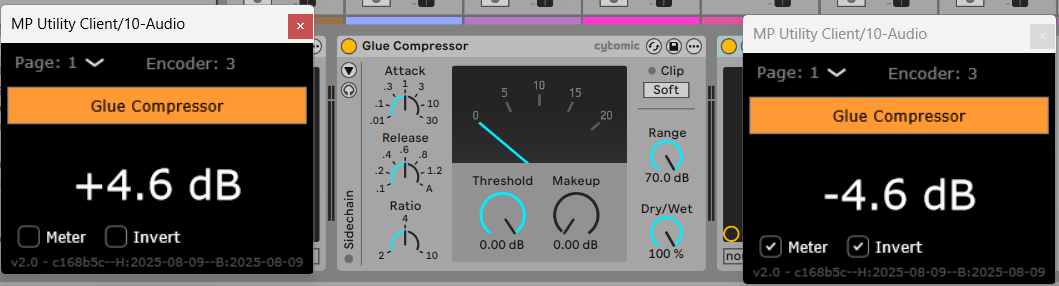
The client plugin can be placed on any track and it will noticeact thatas ita looksgain likeplugin controlled by the MPHcorresponding plugin,encoder exceptshown thaton thetop.
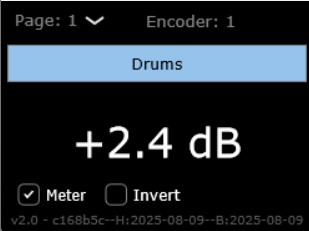
Turning an encoder to the left will reduce gain,gain in increments of 0.1 dB, turning an encoder to the right will add gain. The values are displayed in dBs and the range is -40 to +40 dB.
The meter checkbox when checked (checked by default) sends the volume signal to the server to display it.
The Invert checkbox when checked (unchecked by default) inverts the gain on the client.
Right click on the empty black area to select the target monitor of the mp controller.
Once you load the server plugin (it can be on any track), then load a client plugin.plugin where you want.
The server plugin does not process any audio, it allows audio to pass through it unaltered. The client plugin processes audio with its only function being adding or subtracting volume to the signal.
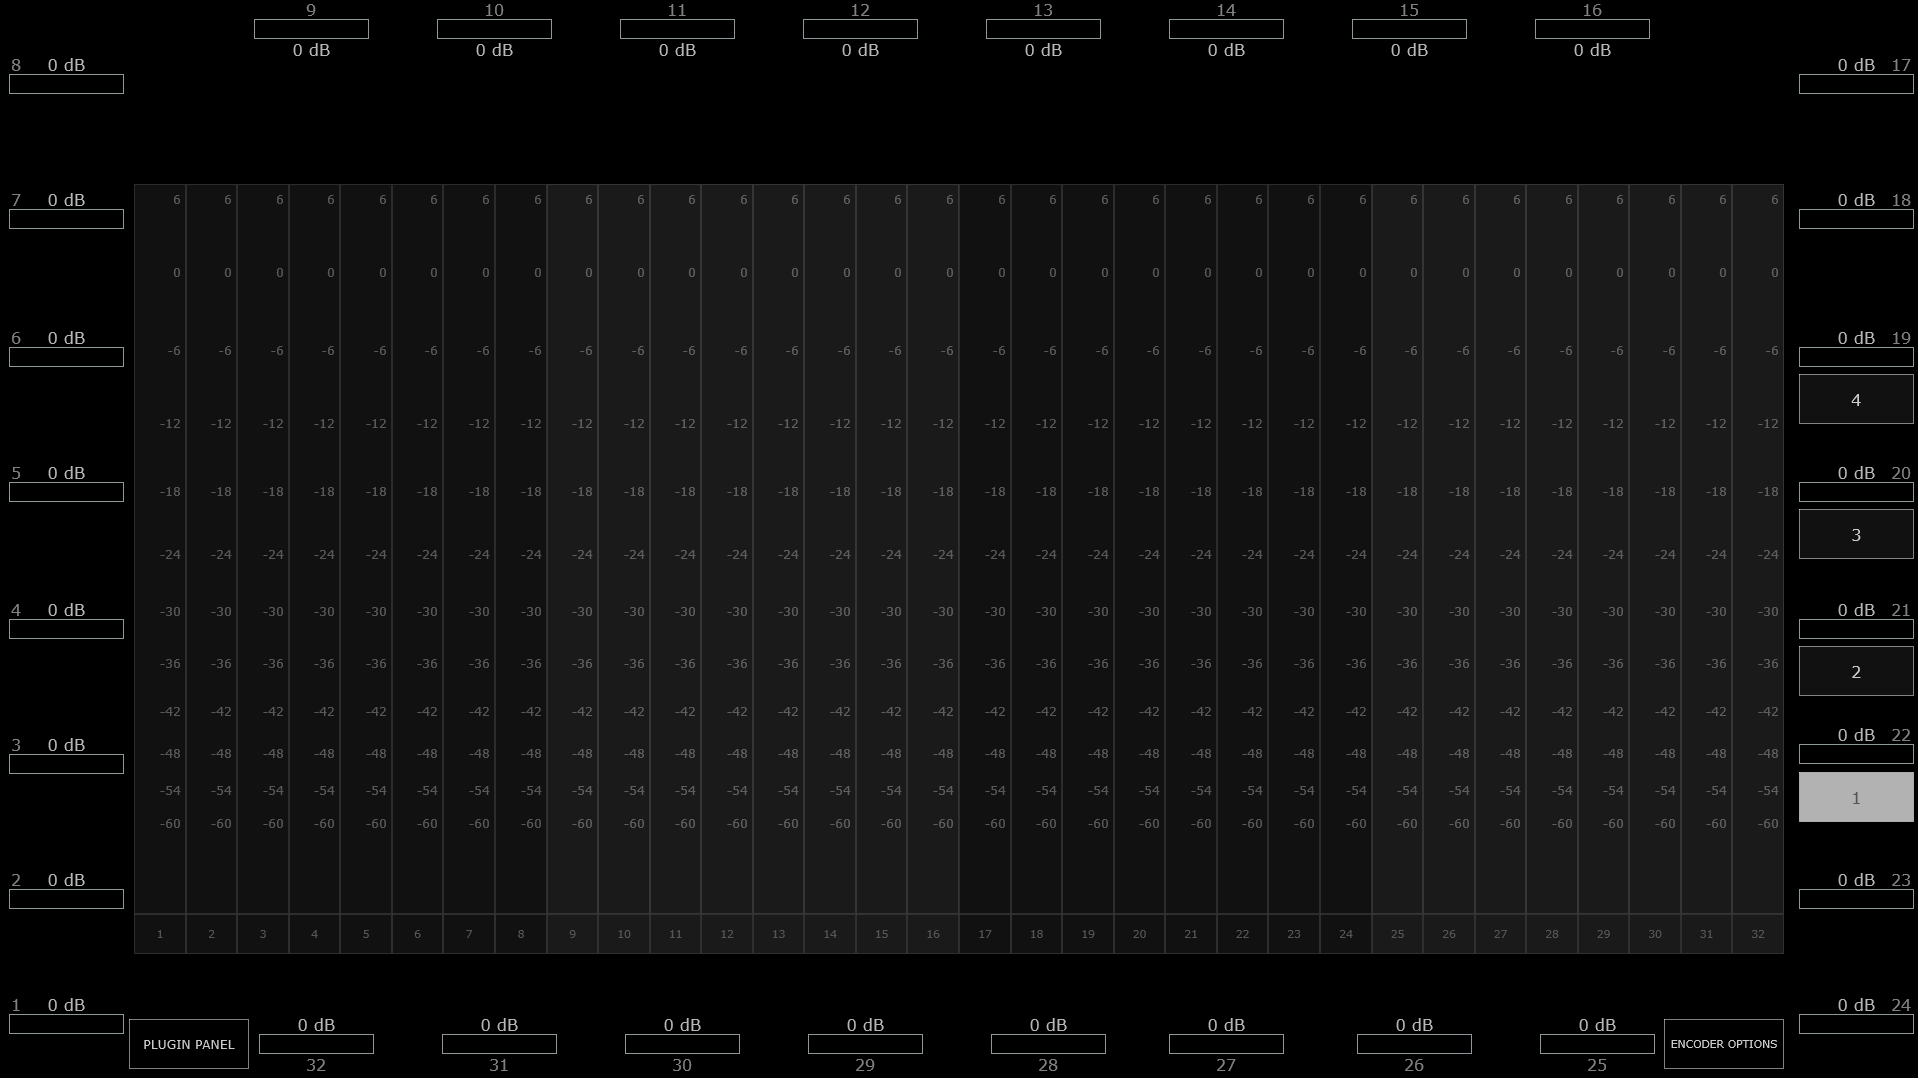
Each client plugin carries an id starting from 00101 to 128.32. Each id corresponds to an encoder on the server plugin and the controller.controller per page. There are 4 pages and they can be switched from the right column of the server.
For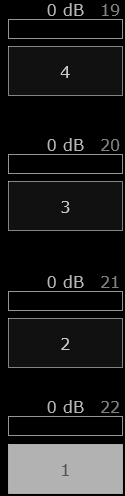
When you load onethe first client plugin, it will take id 00101, mapped onto encoder 1 and it will be controlled by encoder 1 on the controller and soft-encoder 1. If you load another one it will take id 00202 automatically and so on up to 128.32.
You can load multiple client plugins per track, there is no limitation. For example, you can enter a client plugin before an audio effect and one after an audio effect, on the same track.track to do gain staging.
You will need to createAdd a new client plugin everybefore timea plugin you want to control the gain staging, ie a compressor. Add another one after. Disable the meter on the first client and enable the meter on the second client and enable the Invert.
Turning the encoder to add one,gain will add gain feeding the the compressor while at the same removing the same amount of signal. Your signal will remain at the same level and you will only hear the difference made by the compressor. You can apply the same principle to any plugin or set of plugins.
Do not copyingcopy and pastingpast existing client plugins because the client will not take a new id.
YouSelecting cana edit thenew id onfor athe client plugin by double clicking on it, so that it can be controlled with another encoder.
The server window will becopy displayed onover the samename, monitorcolor thatand dB value to the MPHnew isencoder, setoverwriting toany beexisting displayed. There is no option to change the monitor on the server plugin as it reads the same properties file as the MPH.client.
Naming and Coloring
Once you add a client plugin go to the server plugin and name the next available encoder. For example, if you add a client on the Drum Bus and has id 004. This means that you are already using the previous 3 encoders.
So, double click on the name box on the server plugin and type in Drum Bus.
You can also assign a color to each soft encoder via right click at the edge of each soft encoder, just like in the MPH.
Reset to 0 dB
ClickDouble orclick touch inon the centermeter of eachthe softon-screen dB meter of the server next to the encoder and the value will return to 0 dB.

Automation
If you would like to record gain automation using the MPGU, you can do it at the track you placed the server plugin. Each encoder is automatable like in the MPH.
The client has no controllable parameters and it only displays the value in dB.
Total Recall
When you save your project, all the values and state of the server and client will be saved with your project. When you open your project everything will be recalled. If you delete the Server plugin by mistake, just load it again and it will sync up with the existing clients.
The MPGU, unlike the MPH, does not save presets.
Using it with the MPH
You can load the MPGU and the MPH in the same DAW project. The ControlController & DisplayIcon button works as it does on the MPH. Clicking on the C & D button will close any open MPH instancesinstance and display the MPGU on the controller. Clicking on the CController &Icon Dbutton of the MPH, will close the MPGU window and display the MPH.
You can also switch to it from the small bar icon on your Mac or Windows or using the Plugin Panel.
How does the server communicate with the client?
The server and client use the OSC protocol to communicate.communicate Theand communicationit requires port 6000 to be open and available.
If the client and server do not communicate you can check if the port is doneavailable.
On the Mac's terminal enter this command:
lsof -i :6000
If nothing is returned → nothing is currently using port 6000.
If something is returned → it shows the process using that port.
On Windows open a cmd window and type:
netstat -ano | findstr :6000
If nothing appears → port 6000 is not currently in oneuse.
If directionyou fromsee output, the serverlast column is the PID of the process using it.
If some other process is using the port you need to thestop client.be Thein client does not transmit anything backorder to the server. Each encoder transmits data on a network port, starting at port 60000. Each client listens on a port also starting at port 60000. Each time a new client is created,use the newMP clientGain listens on one port higher than the previous one. For example, if you load one client it will listen on port 60000, if you load another one it will listen on port 60001 and so on.Utility.